Introduction
This diorama came about from my purchasing the recently released Master Box "friendly Boxing Match" figure set a while back. I had first intended to assemble the figures straight from the box on a simplistic base and leave it at that, however I have always wanted to make another willy's Jeep after building an SAS desert Jeep a few years back. After looking at the various Jeep models currently on the market, I decided to make one that to the best of my knowledge cannot be bought in 1/35 scale at the moment. It is a "follow me" airfield Jeep that was used in WWII. The wild colour scheme really appealed to me and it looks like a relatively easy conversion from a standard Jeep. The Master box figures I will be using is set around American and British Paratroopers watching a boxing match with a member of the RAF thrown into the audience as well. The whole setting screams out "airfield", so what better an opportunity to use a follow me Jeep in the background!The Jeep
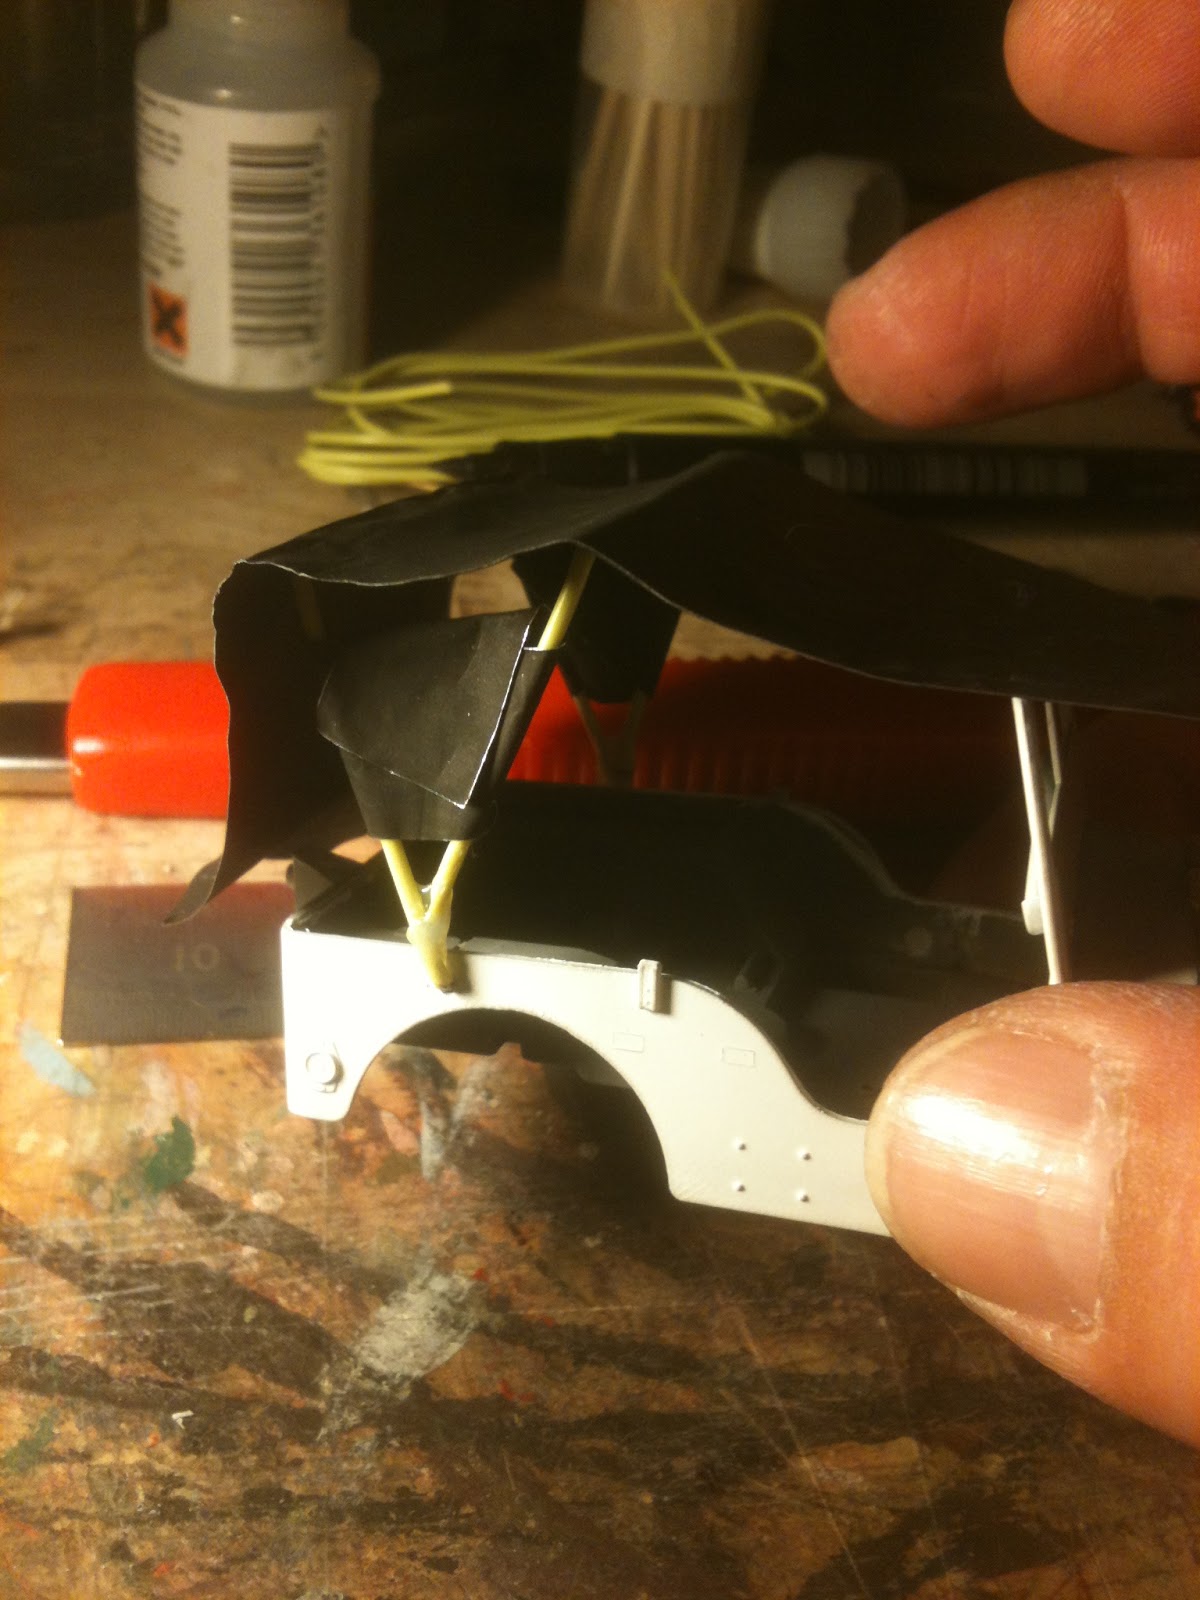
 I decided to buy Italeri's version of the Jeep. It is not the best out there in terms of detail, however it is well moulded, well made, proportionally accurate and best of all cheap! The follow me Jeep is essentially a standard Jeep that has been painted in white/red or black/yellow or black/white check. It has a bikini roof and many of them had the back seats removed to accommodate two rather large radio sets to communicate with the aircraft on the field, while others a smaller set for communicating with an air traffic controller elsewhere on the runway. As far as the build of the Jeep is concerned I am going to keep the main portion of it pretty much straight out of the box. I did toy with the idea of an Aber etch set for it, but being as this Jeep is going to be in the background of the dio and the major thing that people will look at is the paint scheme (hopefully), I decided to keep my money. The Jeep's body was masked up and sprayed in Tamiya White, the Red checks will be applied in the form of decals that I will make later on and I will post a Tutorial on the website for it. I have however decided to scratch build a bikini roof for the Jeep. Italeri do supply a roof with the kit, however in my opinion its far too thick and does not sit high enough when comparing it to the real thing. For the scratch built roof I made a simple wire frame and used another of my recent acquisitions, some light control cinefoil aluminium wrap. Exactly what this stuff is used for in photography I have no idea, but it was being thrown out in work and its great for canvas roofs as its thin, strong, lightweight and already painted in matt black as an undercoat! The following photos show a progressive build up of the new roof being built:


The only other major piece of scratch building that I intended to do for this Jeep is the radio set. From the reference images that I have managed to find of this type of Jeep, it seems like the radio set up was placed inside a wooden cabinet that had been built to fit into the back of the Jeep and then the various bits of radio equipment were mounted into the cabinet. Build of the cabinet itself is not really difficult and I just used some plastic card cut into the sides of the box and glued them together. to give the box a little more depth and a purpose built feel, I glued some cut pieces of copper wire to the front of the box, filled with some squadron green putty and base coated in Humbrol 110. After finishing the radio box I just didn't like it. The box seemed too big and bulky and to be perfectly honest it was ugly and looked out of place. I went back to the research and found a couple of follow me Jeeps with the rear bench still fitted and a smaller radio mounted atop one of the wheel wells inside the Jeep. I immediately raided the spares box and found a Radio that could be cut and shaped to make it a little smaller. I have now fitted the rear bench and test fitted the smaller radio set. It looks a hell of a lot better now and best of all in proportion!
The decals were a bit of a disaster right from the start. Unfortunately the decal sheet that I had bought was not the best quality. It was quite thick once separated from the backing paper and had the tendency to peel and chip away from the edges as the decals were being applied. Fortunately I had a pretty good colour match for the red in my paint collection so I opted to finish applying the decals and touch up where required once the decals had dried sufficiently. You can see the chipping effect on the bonnet of the jeep in the next photos:


 Where the decals overlapped the edges I found that the best way to ensure that the decals did not chip or deform was to apply them as a complete decal, allow to dry then trim the excess off with a scalpel. Normally I would not use this process, but the poor quality of the decal paper I used didn't really leave me with many other options. I have also decided to do a little more scratch building for the jeep. Its not a great deal, just a flag and a wheel cover. The cover is simplicity itself; a piece of plastic card that has been cut with my compass cutter and some red decals applied to give the checker board effect.
 For the flag I used a technique that I developed myself to ensure that if you make your own flag it looks as realistic as possible and you can display it either flapping in the wind or relaxed with no wind at all. What you need is obviously a flag printed out for both sides and some very thin aluminium or other metal foil. Fold the flag and then wrap it around the metal foil, effectively ending up with the printed flag on both sides and the metal foil sandwiched between the two pieces of paper. Glue it all together and trim the foil. The flag can then be positioned in any way that you want and the foil in the centre of the flag will retain the shape.
I have now began the final stages of this little jeep conversion. This includes painting on the checkers for the grill as I did not even want to try the decals being as they were such poor quality. I have also touched up the red checks where necessary but I have decided to leave some of them chipped. From looking at reference photos and reading about this type of jeep, most of them were hand painted at the airfield in any paint that the airmen could get their hands on. This left a less than perfect finish and the paint did chip away quite easily. This of course made me extremely happy to read this bit of information as my original "cock up" with the decals has worked out quite nicley!! I have also started to add the grab handles round the jeep, add wear to the interior seats and floors, add the radio and wooden box, fit the glass and fit the bikini roof. I will add the ariel and flag at the very last minute to avoid any mistakes and breakages while handling the model.


I have also added a map and a check list to the interior of the Jeep for a little extra interest. I will probably add a British helmet painted in RAF blue as these items I would imagine would be a common sight in one of these vehicles. I have not added any weapons or additional equipment as they would not normally be carried around on an airfield. I have also began to weather the interior of the Jeep. The Jeep has also had the wheels drilled and pinned in readiness to fix it to the base and the finishing touches such as the lights, reflectors, aerial, flag, matt varnish and very mild weathering will be done shortly.


The finished photos of the Jeep will be placed along with the finished diorama at the bottom of this page.
The figures
 The figures themselves are excellent. There are no other words to describe them. They required very little filling and finishing to get them ready for undercoat and paint. There is one problem however. Masterbox have decided to make one of the figures (a boxer) as an African American. Now of course there is nothing wrong with this, however when one considers the supplied figures as the audience are British and American Paratroopers, then one must assume that the setting is a British Airfield just prior to the D Day landings. I know that at that time no African American Airborne soldiers were stationed in the UK. I know that this is a minor thing, but if something is screaming out to me that is completely inaccurate, then I will change it. The conversion from African American was relatively simple as I have a number of Hornet resin heads in the spares box. The head was filed to fit the body, the neck of the figure was thinned to accommodate the head and job done. I have retained the African American head for use with one of the Vietnam dioramas that I have planned for the future. The rest of the figures will be assembled as supplied.
The best thing about this particular figure set is the variety in the figures, we have British and American paras, an american serviceman, two boxers, an RAF ground crew and even a dog! The bad thing about this figure set is also the variety in the figures as each one has a different requirement for paint colours and I can't assemble, paint then shade in batches. The figures will therefore take a little longer to finish but I am sure that they will be worth the effort when I finally finish them!
The Base
The base will be kept as a simplistic as possible. Most airfields in the UK at the time were make shift runways on farmers fields or small private airfields pressed into service when the Luftwaffe bomded them during the Battle of Britain, so I will be using various grasses and I will also throw in some flowers for added interest that I have recently purchased from the internet. The main base board will be a piece of cut and shaped MDF that I have salvaged from the skip. As I have mentioned in my German Field kitchen diorama , as far as I'm concerned the stuff is great for small dio settings. The next two photos just show where I placed the vehicle and figures in the rough positions they will be finally set in so that I can mark out the cut lines for the base board.

The position of the figures may change slightly, however it has provided me with a good idea of the finished size of the whole diorama. Once I was happy with the rough positions of the vehicle and figures, I simply drew some rough squares around them in pencil, removed the models and drew a rough line around the whole of the diorama setting. The base was then cut and the edges painted in brown acrylic paint. For the groundwork I applied some polyfiller (white plaster) with a little of the brown acrylic paint mixed into it and allowed this to dry. Some 4mm mixed field grass from war world scenics was added along with three flowers from Fredericas Rex (a recent purchase). And that's it the groundwork is done. I'm really happy with the result. It's simple, effective and serves its purpose well. I will paint the edge of the base once everything has been fixed in place and I am ready for a last spray coat of matt varnish.


Completing the diorama
For the finishing touches to the Jeep I added some interior clutter and a telephone head set attached to the radio. I've taken a few interior shots before I added to roof so you can see whats inside easily:


For the finishing touches I decided to add some light weathering only in the form of rust streaks which would show up very easily on white paint and also some dried mud/dust on the wheels and around the arches. The bikini roof has a light wash in diluted black oil paint to reflect the fact that the Jeep was driving around an airfield in close proximity to a lot of aircraft exhausts and would therefore become quite stained after some use. The follow me sign may look as if its just been hung there and you would be right. It is however intentional as many of these vehicles were converted for this role by the airman at the airfield. This included the follow me sign that was just a piece of painted wood and was suspended by wires poked through the fabric of the bikini roof and hung wound around the support frame.The flag that was normally ties around the support frame with rope has also been added at this stage as well.


The figures themselves are going to be placed in roughly the same positions as the original planned layout. I see no reason to change the positions as it remains quite an effective, eye catching scene. I have also added some grass "clumps" to break up the flatness of the ground. In the future for projects such as this one, I think I will add a little more undulation to the basic groundwork to provide some more interest. I have also added an additional flower to the base as well. for the final photos I decided to take a timeline assembly series of photos as the Jeep and figures were placed onto the base for their final assembly:


Fantastic work Craig! Nice use of that figure set! I don't see the black character though...change your mind on him? I was going to say that nothing says the black guy HAD to be an American serviceman. Maybe he could have been just a local boxer or something. Either way, nice job!
ReplyDeleteHi Jon. Your right on the black boxer, I had a long think about him but in the end I decided not to use him as during world war two as you have correctly stated as I have, there were no African American servicemen in UK. Unfortunately in the 1940's the UK was not the fantastic Multi-cultural society that it is today, and the likely hood that an anglo african would have been allowed to fight a servicemen would have been just as unlikely. He will however be making an appearance in my forthcoming Vietnam Diorama so keep an eye out for him.
Delete