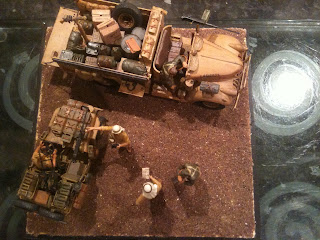
The original model and layout looked like this:

My new design for displaying the Jeep is to place it on a base on it's own as a stand alone vignette, rather that display it with the Chevy truck. I have also decided to remove the driver figure from the vehicle and have selected the two soldiers wearing the Keffiyeh's standing beside the vehicle consulting a map and looking for directions to their next target. Its not an original idea I know, but its factually accurate and I think that it will make a nice little scene.
For the base I wanted to add a little interest as well as showing off the interior of the vehicle a little more so I have opted to have a raised section of the landscape with the vehicle parked half way across the incline. I am using one of my larger molded bases for this and after a little test fit, I think that I will be happy with the results. for the raised sections of the landscape I will be using florists dry flower foam as its cheap, lightweight, easy to carve and cover. To fix it onto the base I will be using a combination of cocktail sticks and glue to fix it into place. Once dry I added some coloured filler plaster over the entire base. To cover the florists foam on the edges of the vignette I glued some very thin plastic card which I will trim to the landscape once dry, then fill and paint in enamel matt black. The base itself will be painted in brown acrylics. I am going to leave a lot of the descriptions to photographs were necessary as hopefully the pictures will be self explanatory


The next stage is going to be the ground work. The first thing that I used is Kiln dried sand that is normally used as a grouting medium for block paving. This is applied onto wet PVA and then two or three more layers of this are added until a good thick base coat is applied. The cocktail sticks that you can see in the photographs are to ensure that I don't "lose" the mounting holes for the Jeep or the figures. You will also notice from the photos above that I added a stone into the wet filler. This is just to add a little more interest to the base and its something that I picked up when walking the dog near a stream. The next stage was the addition of some ballast stones which were bought from a model train outlet. Some green foliage was dotted around and then another coat of PVA was added and some budgie grit applied to the base. I would just like to take a moment to mention @vidpui, a follower of mine on twitter who put me on to this excellent product that I bought from my local pet store for a modest 50p for enough grit to make around 40 of these bases! Once the PVA had dried, another watered down wash of PVA was re-applied and some more kiln sand poured into the gaps of the budgie grit. The whole lot was allowed to dry and I am really happy with result. The already completed Jeep and figures were applied to the base, some final paint touch ups and that's it, One completed re-based SAS jeep with figures. I hope you like the result. I just have to think of something to do with the LRDG Chevy truck now!!


No comments:
Post a Comment