Introduction
Normally I start these introductions with "this was an impulse buy", However this one will start with "this is a result of my wife making an impulse buy for me". She was in a hobby store with a friend looking for something completely unrelated to scale models when she decided to take a look at what scale models they had being as my birthday was coming up. Unknown to me she has a very good idea of what models I have in the stash waiting to be built. She also knows that I like building Tamiya because of the quality. When she spotted this Chieftain on sale, she knew that I would be over the moon with it. SHE WAS RIGHT! Around 18 months previously I had built an Airfix 1/35 Challenger Mk II out of the box as a "challenge" to myself to see if I could improve what is universally agreed as a terrible kit. I think I succeeded and I am really proud of the result. If your interested you can read about that build here. Anyway; back to the Chieftain. While researching the Challenger I had viewed a number of images of the Berlin Brigade. I was immediately taken with the unusual city camouflage and although I did consider it for the Challenger I realised that there were far more reference shots available for the Chieftain so the best chance of an accurate result would be with that model of tank. Fortune has now smiled upon me from my wife's surprise present. So here's to another build and hopefully an interesting, technical paint job on a venerable tank from the cold war:
The Kit

Its a Tamiya kit that was made in the early 1970's so its officially older than I am! Usually with kits this age I find that they have a litany of issues with parts fit, inaccurate parts, etc. I have to say that on initial inspection its a pretty accurate kit. The parts fit when test fitting is really good and I can't see many major issues with parts miss moulded or warped. There are obviously ways that this kit can be improved with aftermarket etch sets, resin updates for later mods and tracks. In its basic out of the box form though its fantastic value for money. My plan for this is kit being as I had intended to paint it in the Berlin Brigade block camo scheme is to build it straight out of the box. I am hoping that a clean build and striking paint finish will be sufficient to carry this model without the need for any aftermarket additions or major scratch building as I had to do for the Challenger II build a while ago.
The build
This kit was originally sold as two options. A basic model that I have and also a remote control version with motors included. Unfortunately because both kits share the same moulds, this one has the holes underneath for the additional wheels and for some reason is missing large sections from underneath (for heat dissipation?). While you probably wouldn't notice this once its all assembled; I could not leave these open so first order of business was to cut some plastic card and then smooth over with some filler:
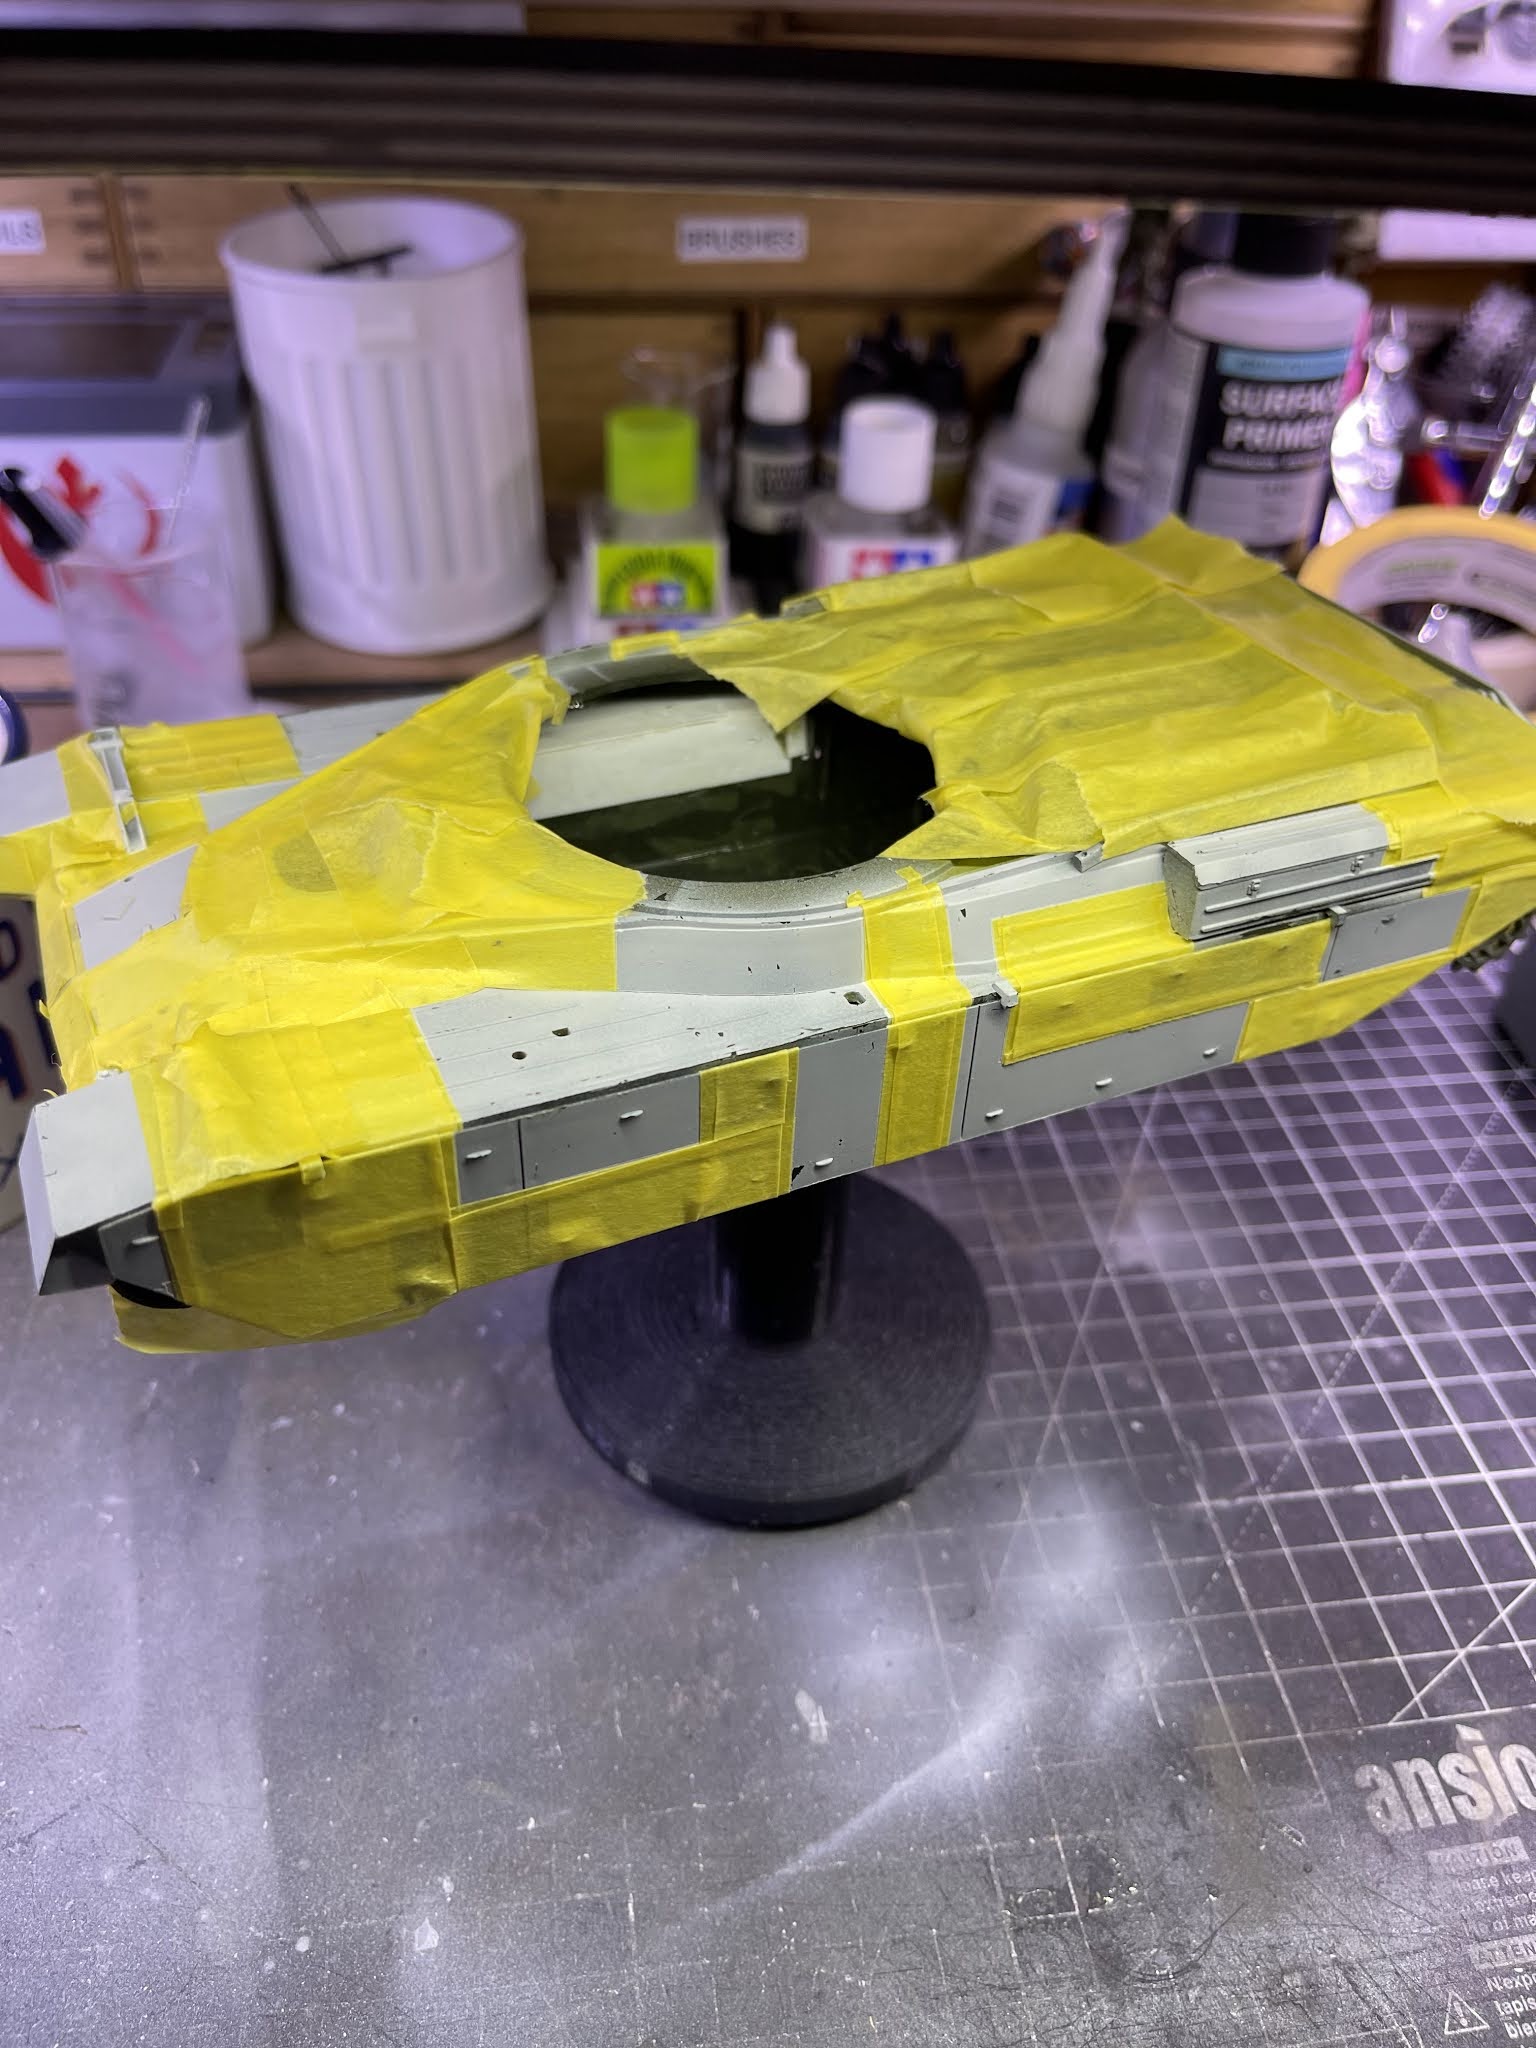
Once the initial filling was complete I decided to set up a two colour primer production line. Where the standard NATO green was to used I used a green primer to help it along and then where the Berlin Camo was going to be applied I used Vallejo grey primer which is virtually white so this would provide a good basis for the scheme. I also held off from applying a solid primer layer in the grey hoping that the variation in its colour from the dark green plastic underneath would provide some initial tonal variety to the white paint once it was applied.
To increase the chances of getting a crisp finish to the paint lines I also opted to leave many of the surface detail parts off the hull of the tank and I intend on spraying these separately. Hopefully this approach will give me the best chance of an accurate; crisp scheme as possible.
The Berlin Brigade Camo pattern
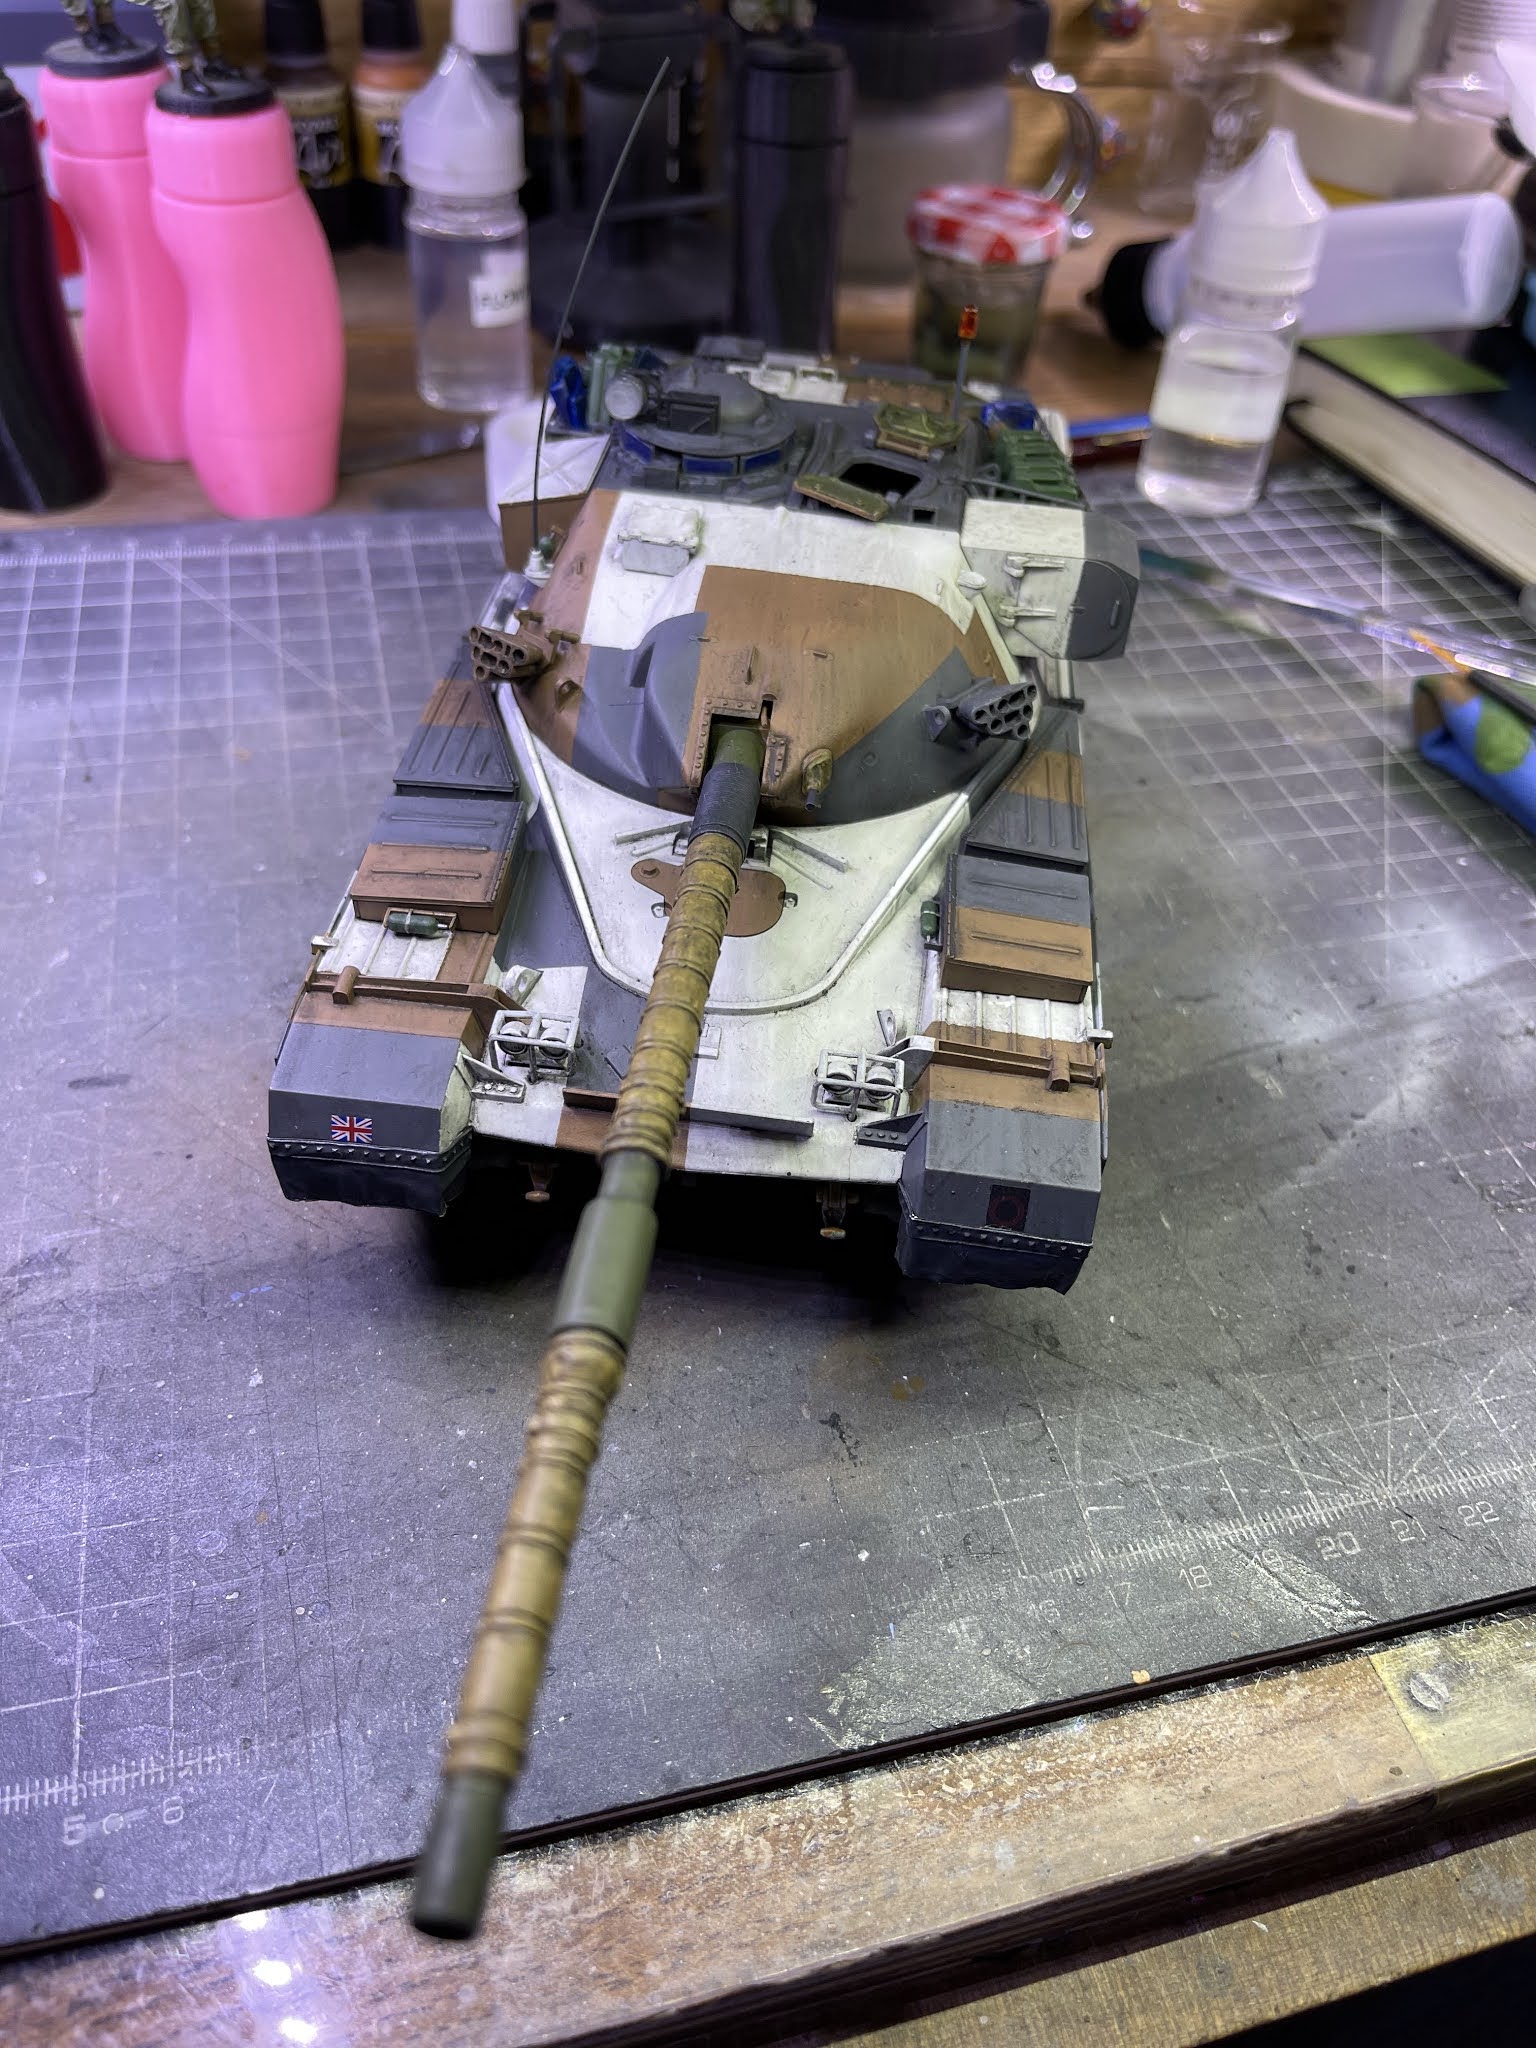
From what I can ascertain from the multitude of web sources that I have scoured trying to find as much detail as possible; the scheme was chosen to help blend the tanks stationed in and around Berlin with their city surroundings. If the vehicles were painted in Green or standard NATO camo they would effectively be highlighted against the buildings. However; painted in Blue/white/brown the outline of the tank was broken up considerably against city/town buildings and proved difficult to spot. I suppose you could regard this as one of the original "urban camouflage" patterns. The other major thing that I had learned was that every tank was painted in exactly the same pattern scheme to avoid them being "counted" by the Russians to ascertain just how many tanks were stationed in the area (thanks to Jim Tomms on twitter for this info). The good news about this was that I could view a lot of reference images of different tanks and still get a good pattern for each of the colour blocks to set out the masking tape. I know that some of you reading this will say that the colours were actually duck blue/white/brown, however after looking at a large amount of reference material I began to realise that with each later mark of Chieftain; the blue became lighter and brighter. As this is an early version I decided to go with the darker shade of blue.
Painting
The first colour that I chose to lay down was the NATO green as this could be allowed to harden ready for masking to be applied in anticipation of the other colours. This is surprisingly limited for a tank as only the track wheels, undercarriage and engine bay covers were left green. everything else was over-painted. I have looked at a number of other models painted in this scheme where the model maker has painted the engine covers in the brown camo colour but I have not been able to find a reference image that shows this. Whether I am right or wrong about the engine bay I am happy with my choice of green as this will probably provide additional interest when viewing the completed model. The colours for the Berlin camo were chosen from as close an accurate reference that I could find that translated to Vallejo colours (My preferred paint for airbrushing). If anyone reading this is interested in the colours then they are: vallejo model air, .034 AMT-11 blue grey, .279 insignia white and .035 camouflage pale brown. To ensure the best possible chance of success for this camo I painted it in 24 hr sittings between colours and used frog tape low adhesive masking tape (yellow). I won't lie; it was a complete ball ache to ensure each line was closely matched to the reference images I had saved (there was a lot!). I also used an engineers square where possible to ensure every line was matched at right angles to each other. The old saying that preparation is everything; certainly held up for this build. Using the approach that I have just described resulted in a completed paint job with no tear outs whatsoever and if I choose a project in the future with a complex technical paint job then I will definitely repeat the same process.

for the ancillary parts that I had left off the main body of the tank, I had to paint the main tank completely first so that I could place the parts onto their fixed positions and then pick up the masking lines from the tank body to ensure that when they were painted; everything would line up as expected. The barrel and main wheels were assembled as well as I waited in between paint coats. while the main wheels were not the most detailed; I was pleasantly surprised with the details that were there. The barrel came together quite well and will certainly pass scrutiny once painted and weathered:
The Figures
In terms of completing this model I do have an "ace" up my sleeve; a resin figure set that I have had for quite a while. It was bought second hand off e-bay and I had no idea what I was going to use them with but they seem ideally suited for this model. In all honesty; a couple of British squaddies standing around drinking tea would probably suit most British vehicle models! I quickly realised however that these figures suited the tank a little too well for a coincidence, so after a little digging around the internet I discovered that they are made by AC models (a New Zealand company) and they are a specific set for the Chieftain!! I also decided to change out the cables for the tank using a locking wire pliers from my toolkit (I'm an aircraft engineer by trade) and I made up some front mud guards from some aluminium photographers foil:
I am now at the point of completion for the main colour scheme. Now that its over I can honesty say that I really enjoyed doing it (
despite saying what have done about half way through the build!). I actually found the addition of all the ancillary parts to the tank was more stressful than the spraying due to being worried that I might damage the paintwork! fortunately nothing was damaged in the assembly process and the tank came together really well:
I must admit that in my haste and excitement I completely forgot to take images of the tank in its finished and weathered condition. Sorry. I did however have some fun with the weathering being as I would not be using earth tone colours or adding some mud to the tracks and wheels. This was a city tank so only a city weathering would do. I originally intended to not add any corrosion colours as I had incorrectly assumed that these city tanks would be looked after to the point of waxing them!! How wrong I was; although minimal, every colour photo I have found of Berlin tanks has corrosion present. The first weathering layer was therefore orange rust, followed by a very watered down black for a "city grime" effect followed by successive lighter washes of orange, black and burnt umber until I was satisfied that it was dirty but not too dirty!
The base
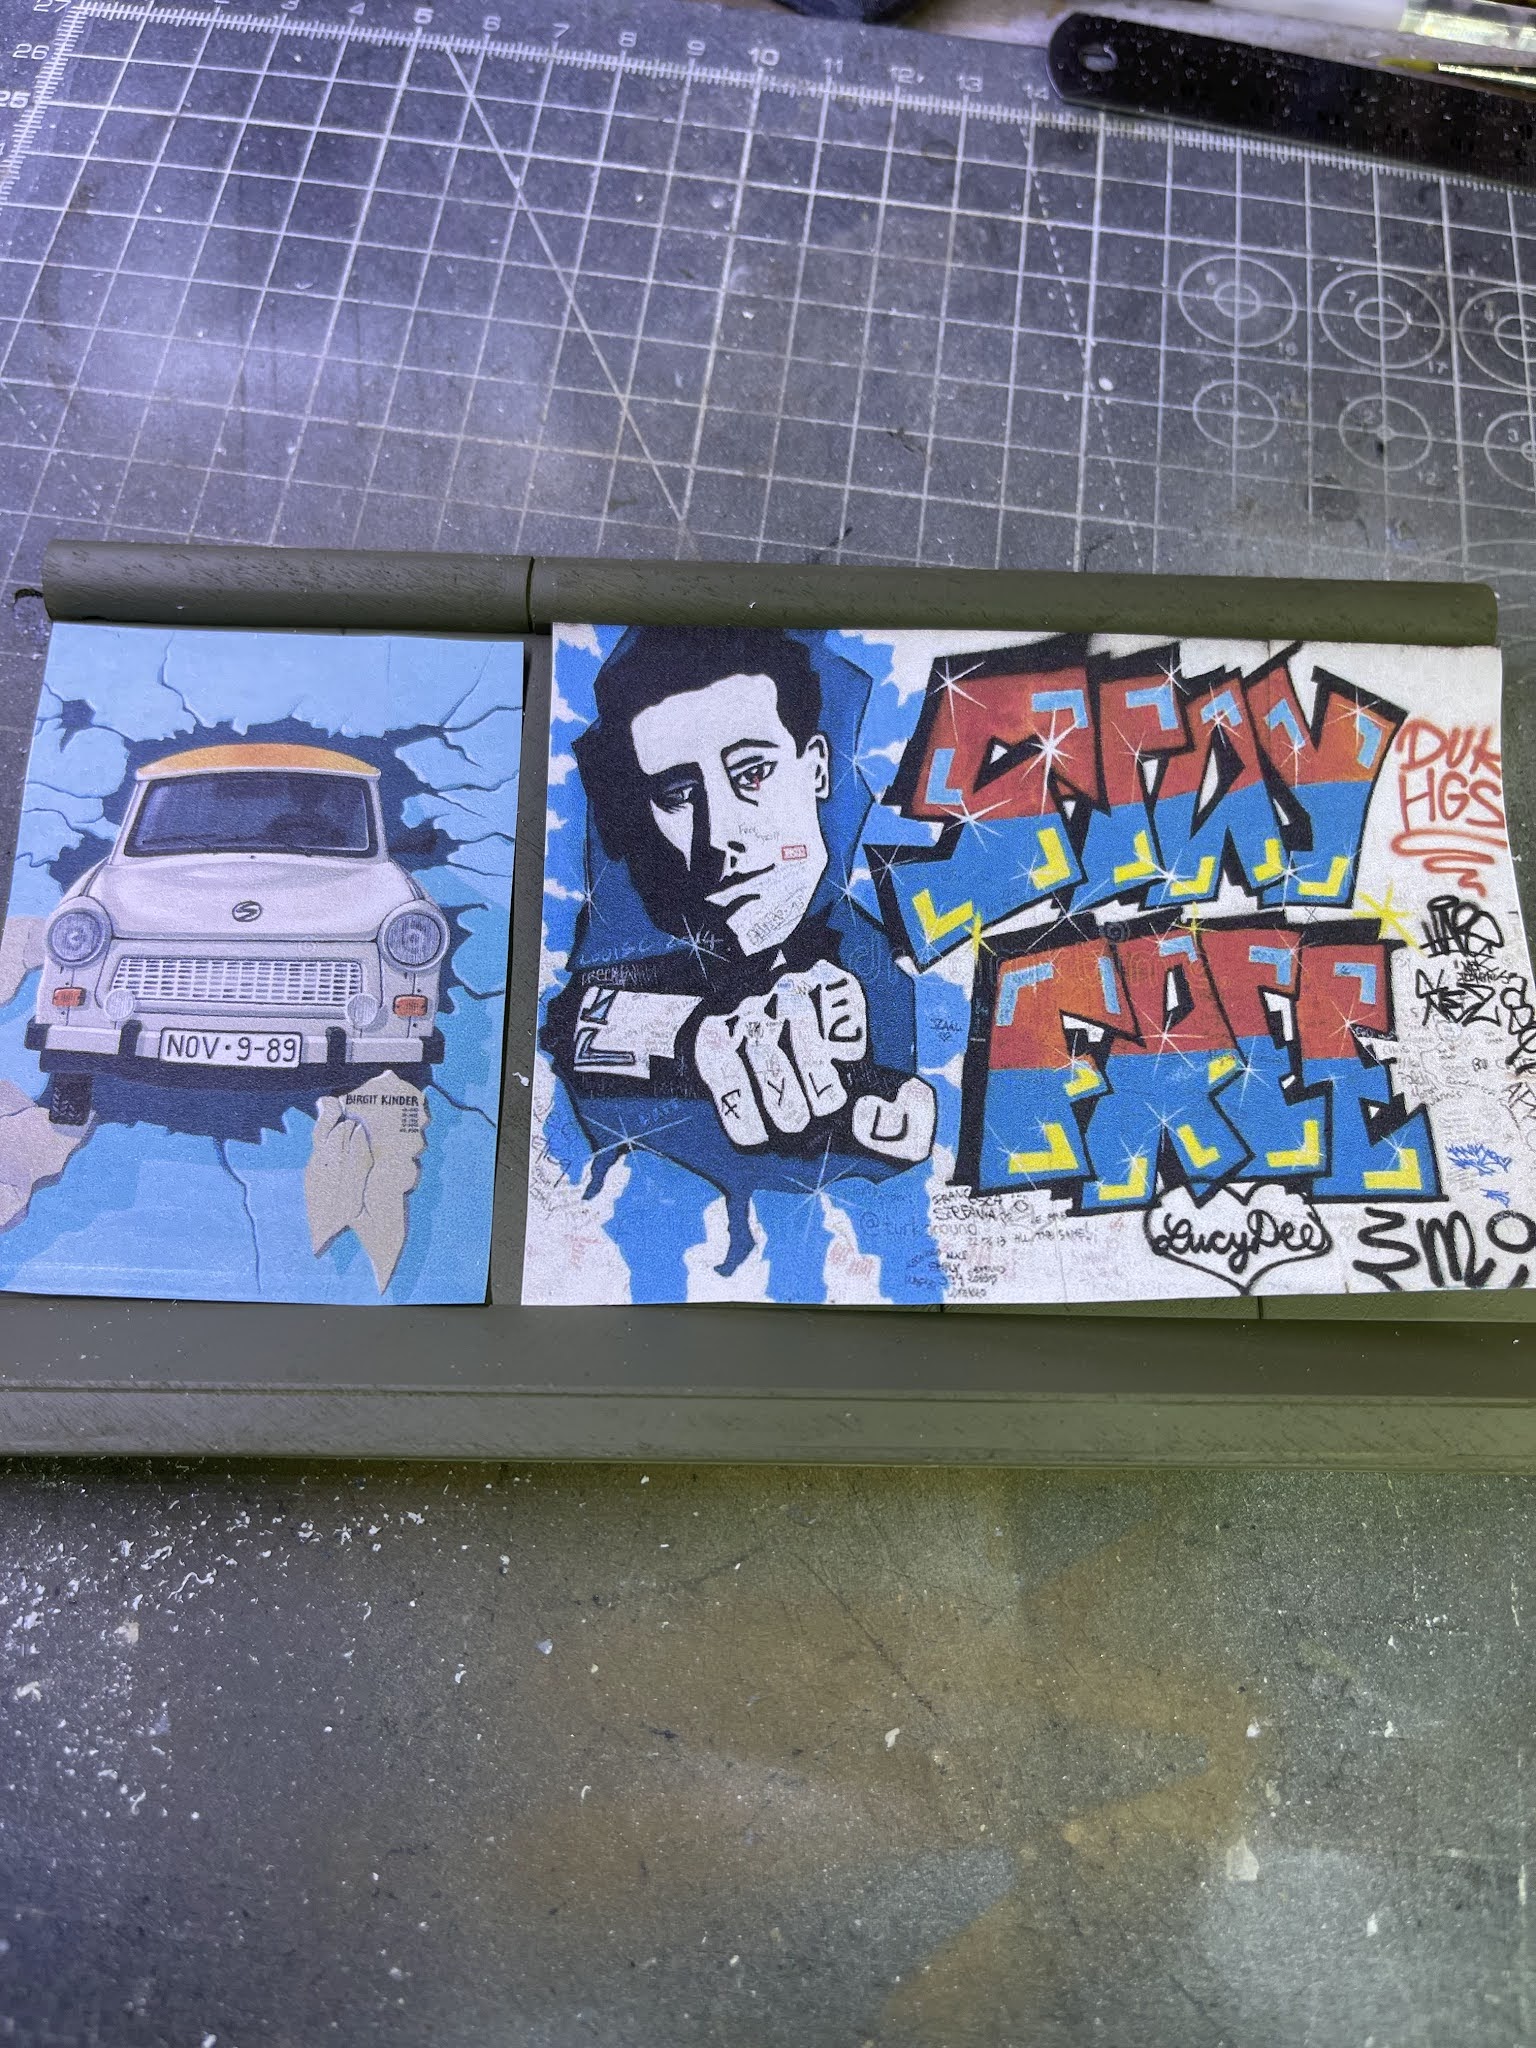
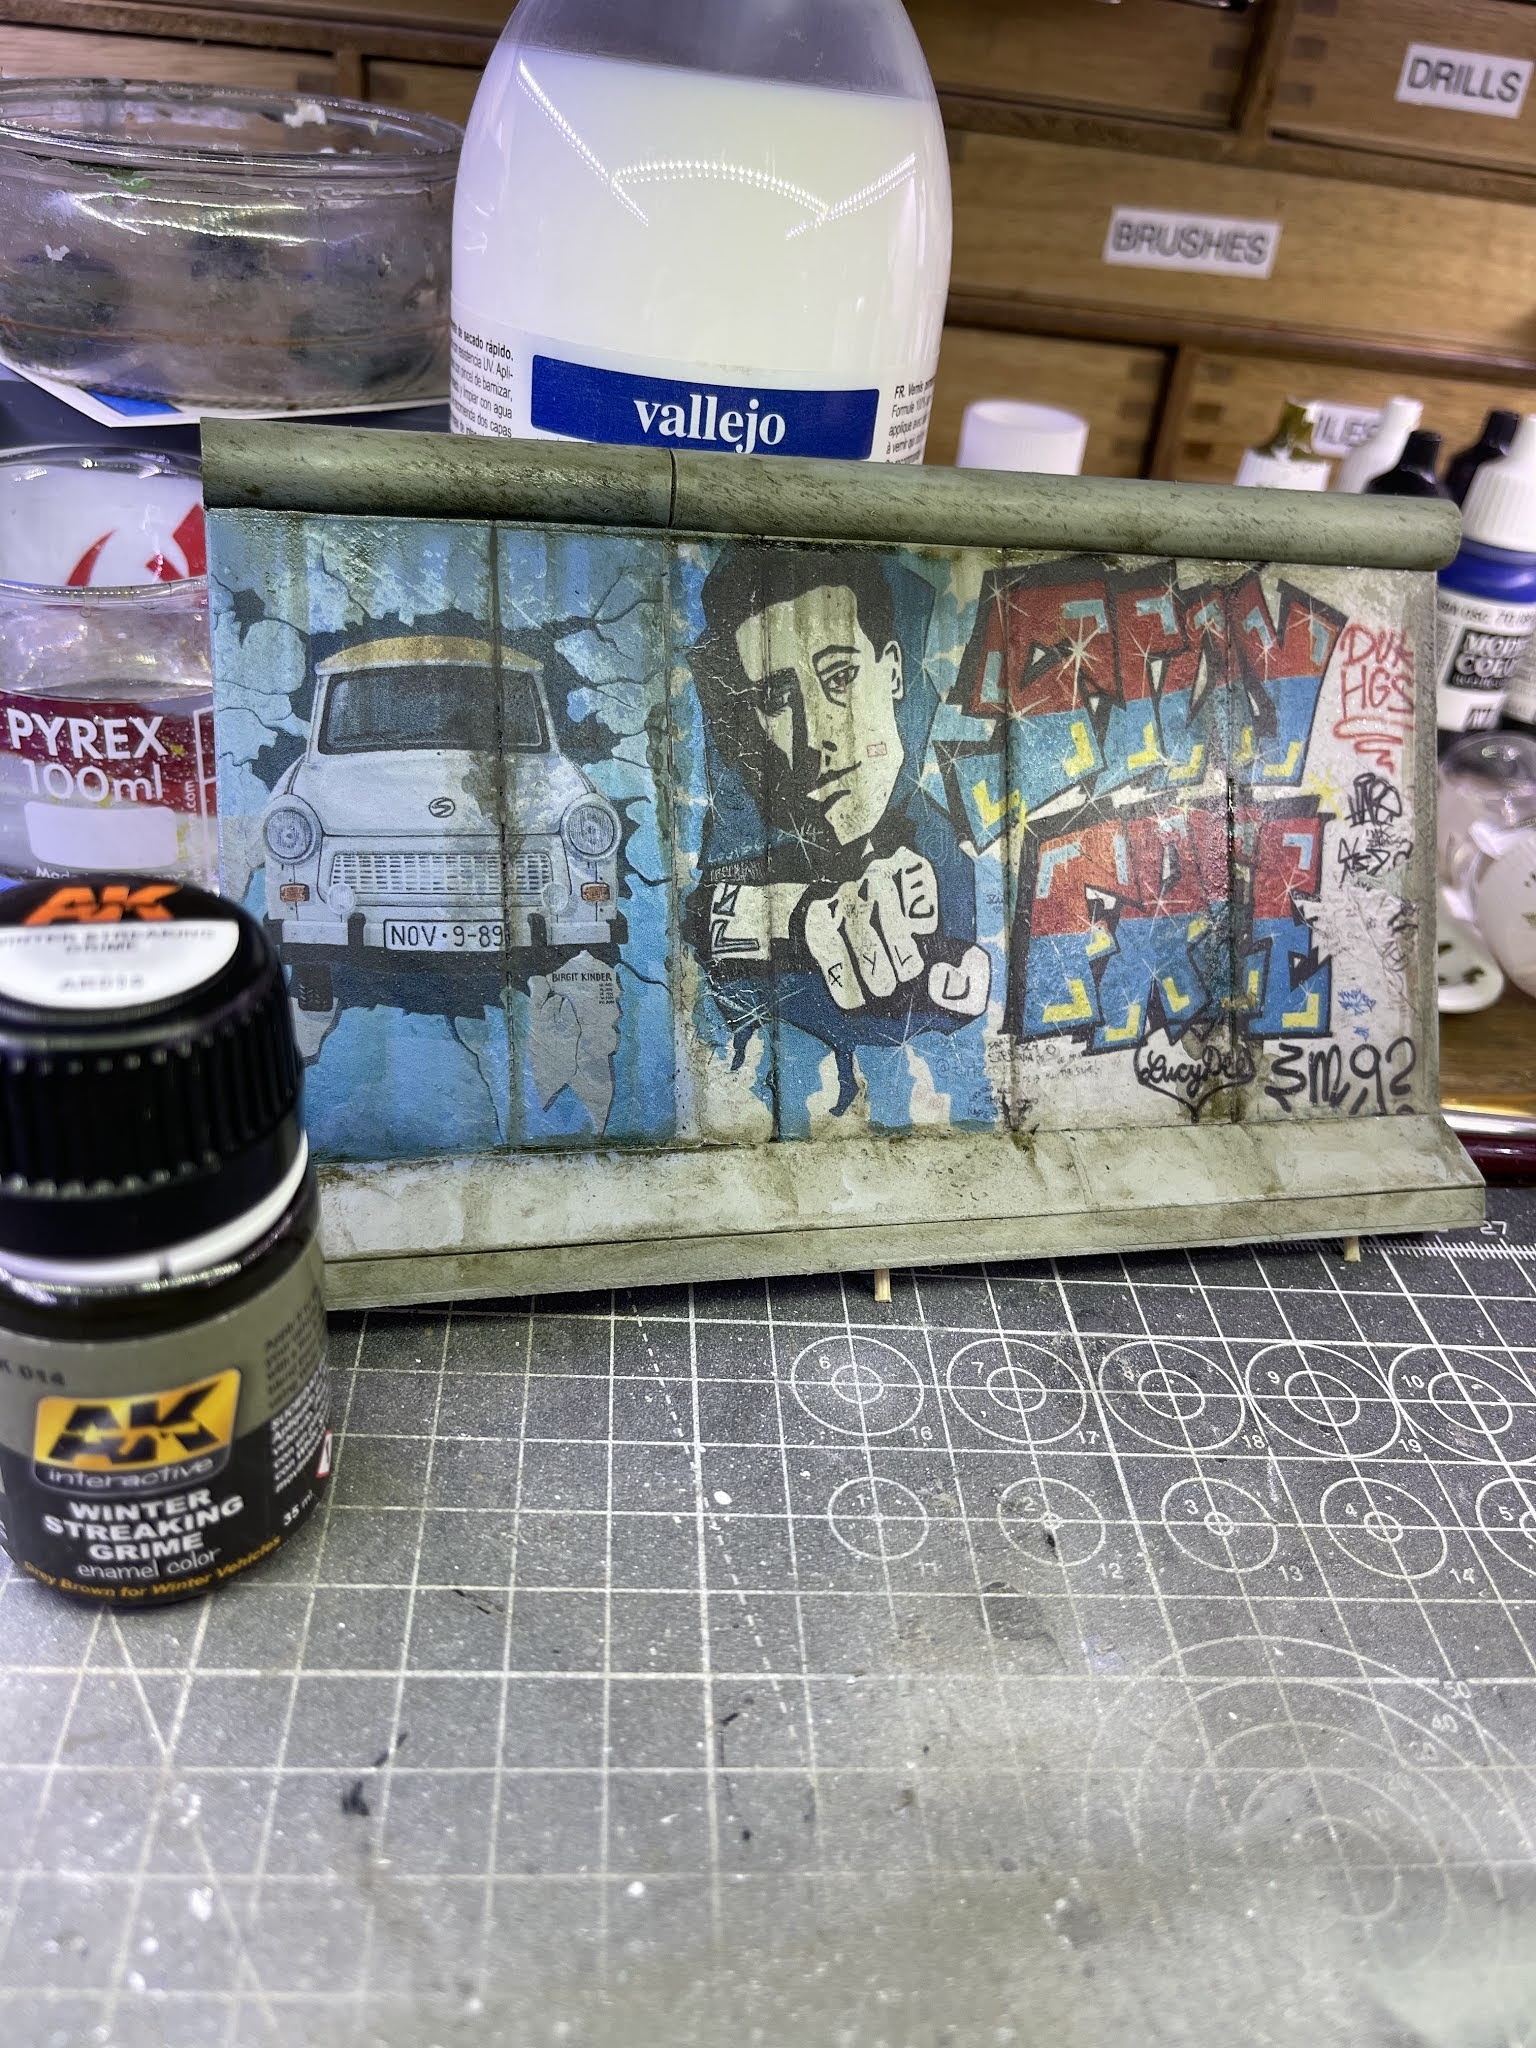
I had originally intended on a simple display using a photo frame but when I placed the tank on it just seemed to be lacking. I always like to add something that helps identify the location or setting that the vehicle was used. For a Berlin tank; the answer was simplistic enough for me: the Berlin wall. To build it I was able to find an actual engineering drawing that contained exact measurements. I glued some wet or dry paper to the base which will be painted to represent tarmac being as most of it will be hidden under the tank when its mounted and added some blue foam kerb stones. The wall was then a case of scaling it down from the drawings and building it from some plastic card and tube. For the graffiti I was able to find some actual hi resolution images of sections of the wall; I chose my favourite two and printed them out onto some clear decal paper and hey presto! A section of the Berlin wall was made!! Yes there is a lot of careful painting, weathering etc to make it a presentable back-drop, but I am really happy with result so far:
For the weathering/finishing of the wall section I decided to use some heavy weathering to not only give the backdrop a feeling of desperation but to cover the seam line between the two separate decals I used as well as the decal edges. A wash of black Vallejo was used first to highlight the concrete seams and joints and then once dry; I used two enamel washes from AK. The winter streaking and green grime:

This backdrop has now become my favourite scratch built model/vehicle base to date and I'm really happy with the minimal cost/maximum impact that this turned out to be.
Finishing the model and final photos
To finish the model I decided on filling the baskets on the side of the tank but opted not to overload it with the normal detritus that you usually see on tanks. This is purely because every reference image I have found of Berlin Chieftains; they don't have anything (probably because of their proximity to their base in the city). I chose some fuel cans from the tamiya fuel can set and also some folded photographers aluminium sheet painted to look like some tarpaulin. The figures; now painted were carefully added to the rear of the tank and held in place with some superglue. That's it! my Berlin Brigade Chieftain is complete. Could I have spent time pouring over each individual inaccuracy of the model and rectify it? Could I have added some handles from wire rather than relying on the kit moulded parts? The answer is of course yes however; this was never about building as accurate a model as possible. It was all about that colour scheme and I am happy with my interpretation of the model. The AC figures simply finished the whole aesthetic of the tank that I wanted to capture as well, being as the Cold War was almost always a hurry up and wait scenario punctuated with hot cups of squaddie tea!

More models coming soon as always; I'd love to hear what you think in the comments below.
 Its a Tamiya kit that was made in the early 1970's so its officially older than I am! Usually with kits this age I find that they have a litany of issues with parts fit, inaccurate parts, etc. I have to say that on initial inspection its a pretty accurate kit. The parts fit when test fitting is really good and I can't see many major issues with parts miss moulded or warped. There are obviously ways that this kit can be improved with aftermarket etch sets, resin updates for later mods and tracks. In its basic out of the box form though its fantastic value for money. My plan for this is kit being as I had intended to paint it in the Berlin Brigade block camo scheme is to build it straight out of the box. I am hoping that a clean build and striking paint finish will be sufficient to carry this model without the need for any aftermarket additions or major scratch building as I had to do for the Challenger II build a while ago.


No comments:
Post a Comment