Introduction
I decided to add my views on airbrushing for model making. I don't intend on making this a definitive guide on airbrushes or what the best airbrush is at the moment. I won't even try to talk about the best airbrush techniques for model making; why? Because I am by far no expert on the subject! I am however a beginner in using an airbrush to regularly build and finish models. So if you've just started using an airbrush or are considering using one then this is the post for you!!
What to buy?
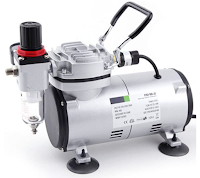
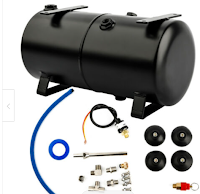
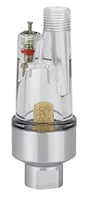
Well this is the subject of many an article and video online and trust me I have watched a lot of them! Ultimately I would advise that when you are starting out the most important piece of equipment to invest in is a compressor, not an expensive airbrush. There are loads of options out there and these can range from compressed air cans (disposable after use) to expensive named brand compressors that can run to hundreds of pounds. I initially tried the air can and can say that it is definitely not worth the money. As the air is released from the can; the can becomes cold and the air pressure drops. At best you get an inconsistent paint finish and at worst it will not last anywhere near as long as you want it to. The cost is considerably high when one considers you are being sold air! The best option is to invest in an air compressor that has a tank (reservoir) attached to it. The main advantage of the tank is that it will remove any fluctuations in the air pressure being delivered from the compressor. Another advantage is the regulator that almost always comes with the compressor so that you can fine-tune the paint delivery from your airbrush. I would also add that the ancillary but essential parts that you will need should also be costed as part of your budget. Below is a bullet pointed list of the basic set-up that you will need to start airbrushing:
- Compressor with regulator & pressure gauge
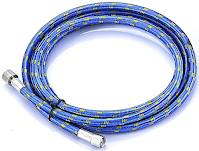
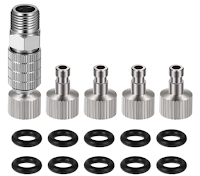
- Quick connectors (for airlines)
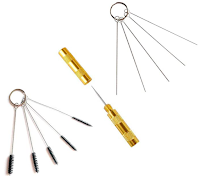
- Airbrush cleaning brushes
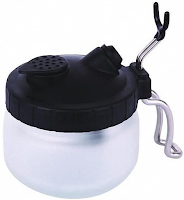
- Mask/filter (to be worn when airbrushing)
This list isn't in anyway exhaustive but it is what I consider an essential list of equipment to begin down the road of trouble free airbrushing. I have not included the airbrush as again these vary significantly in price and quality. As far as compressor selection I would suggest buying from somewhere such as amazon (for online shopping) or alternatively a specialist airbrush supplier (there's lots of them). In my humble opinion; a brand name is not as important as the reviews for the compressor left by customers (why I suggested amazon). It should be oil free (less maintenance) and as quite as possible during its operation. This may not seem important but over a period of prolonged use, the quieter the compressor; the longer you will retain your sanity while using it! The compressor unit itself is cheaper without the pressure tank and if your budget will only stretch to this then not to worry as there are plenty of options out there to buy a pressure tank at a later date and fit it to the compressor.
Airlines, water separator, etc can be bought from any source and again in my experience price does not equal higher quality for these so shop around for the best prices.
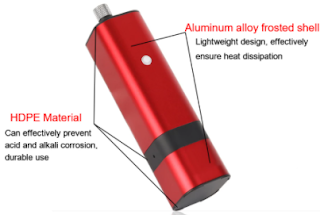
I've also recently had a mini rechargeable airbrush compressor as a Christmas gift from my daughter. It costs around £45 from Ali express although they are sold on other websites. She bought me this as when I go on holidays in my own country I like to take an "away case" so that I can make models while I'm on holiday (yes I know I'm obsessed!). Taking a complete air compressor and tank is not practical however this little bit if kit is ideal. The advertisement states 32 Psi from this little unit however when I've connected it to my pressure gauge it produces 23 Psi consistently. For my airbrush this is more than enough and I must say that its great quality for the price. I doubt it would last a long time with consistent use however if your working on a budget and don't want to shoulder the cost of a full size compressor straight away then this is a viable option to consider. For a more in depth review of this please click this link:
Airbrushes
There are several types out there that will suit your individual needs. My first airbrush was a Revel airbrush that cost under £20. The image below is the updated version of this airbrush. Looking back it was not a good airbrush and was extremely limited in its capability for accuracy and reliability however; it did provide me with a great introduction as to what is capable from an airbrush when used on models. Needless to say I did not keep using this for very long but again if the budget you have is limited then don't be afraid to get this and use it as it does work.
The next type of airbrush that I purchased and still use today is the "knock-off" style of airbrush manufactured in China. I don't wish to be that unkind as some of these brushes are very good quality. They have earned their reputation as the designs of the brushes are very "similar" to those manufactured by well known and reputable companies. My particular brush cost around £30 from Amazon. Picture below:

This was a huge step change from my first airbrush. Its reasonably good quality and is of the dual action variety. For the un-initiated this simply means that the trigger when depressed releases the air and then when the trigger is pulled back, it releases paint from the cup. The benefit of this design is that you are able to control the amount of paint released from the airbrush as you are using it. This is very handy when you want to spray a fine mist (simulate dust) or a full coverage (initial colour coats). This particular brush came with two additional needle and nozzle sets which allow me to choose how fine a line I can spray at any one time. There are additional adjustments on this particular airbrush such as a screw setting to limit the amount of paint flow even when the trigger is pulled back all the way. I have used this brush for a number of years to great effect and cannot knock its quality. Again I must stress that there are a multitude of these cheaper brushes on the market for varying costs and unfortunately this also means varying quality. I would not recommend that the higher the price of this kind of brush is indicative of quality. I have read several horror stories of people paying up to £50 for one of these brushes and it simply didn't work as advertised and others who have paid sub £20 for one rave about its quality and versatility. To put this simply, do your homework. Read as many reviews from multiple sources if possible for the make of brush that you are thinking of buying.
The brush that I also own and use for extremely fine detail work where accuracy is key is a Harder and Steinbeck Infinity CR Plus 2 in 1,V2. This is an amazing quality brush that screams versatility and excellent design. I deliberately didn't start this guide with this brush as it was not cheap. The particular kit that I have will cost you in excess of £200. Is it worth the money? Yes without a shadow of a doubt. It's truly sublime to use and completely faultless in its operation. Would I recommend this brush for a beginner? No absolutely not. Why? well if you are just starting out then no matter how good the tools are, you will make lots of mistakes which could also mean damaging parts of the brush as you clean it. A needle/nozzle set for my Gocheer will cost you around £5 online to replace the one that you may have damaged. For the same set for my Harder and Steinbeck, it will cost around £40. Buy the cheaper brush; learn how to use it; make your mistakes with it and then when your confident go for the higher quality one. I didn't buy mine until around 3 years after I started airbrushing my models.

Looking after your kit
This is something that I don't see written about very often. There's loads out there for what to buy and whats the best airbrush for your needs , etc. However I very rarely see information on cleaning and maintenance. For the compressor there is very little maintenance to carry out as they are after all designed to be maintenance free. The only care advice I would give here is to allow it to fully cool in between paint cycles as they can get extremely hot during use. For the pressure tank though there is one piece of essential maintenance and that is to regularly drain it of water. When you compress air; any moisture in the air is quite literally squeezed out of it. Depending on the humidity of the air, the amount of water will fluctuate. Ultimately if you don't do this on a regular basis the water will begin to fill the tank leaving less and less space to store compressed air and water also corrodes, leading to pressure loss from the tank as it weakens from corrosion. Draining is simple. at the very bottom of the tank is a screw that can be undone allowing the water to be drained. From a safety point of view this should be done after the tank has been depressurised and over a bowl or bucket as rusty water stains everything.
When it comes to the airbrush I STRONGLY advise that you watch lots of youtube videos about the correct way to dismantle and clean your brush. Read the manufacturers instructions (if supplied) and never think to yourself that its something that you can tomorrow. I know a few people who have just cleaned their brush as they would between paint colours and thought that is sufficient until the next time you use it; its not. The slightest amount of dried paint can accumulate even more paint over time and this results at best with a drop in airbrush performance and at worst a complete blockage. Its always easier to clean wet paint from a dismantled airbrush than it is to remove a few layers of cured paint if left. The other piece of advice that I would give to increase the longevity of your brush is to use acrylics only. I know that many model makers prefer to use enamels (myself included) however they require volatile thinners for airbrush use. This not only results in some pretty nasty aromas but it also eats into airbrush seals while in use and while cleaning with the same thinners. Acrylic paints have come a long way in terms of their quality, they require far less volatile thinners to use in an airbrush (sometimes just water) and can even come pre-mixed for airbrush use. Clean up is far easier and gentler on the airbrush seals and due to their low odour they require far less ventilation to use. If you are wondering what paints I use for airbrushing; I use Vallejo model air as I find their quality and coverage is far superior to others on the market today. Ultimately paint choice is down to you and what works for me may not work for you. Paint is as much trial and error as learning to use an airbrush so don't stock up on one make alone as this could become a costly error.
Paint thinners and everything else
This is something that I know will continue to be debated for as long as people use airbrush and paint. The reality is that you will have to clean your brush and you will at some point have to thin your paint. I almost exclusively use Vallejo acrylic paints in my airbrush but I'm pretty confident that what I use can be adjusted for use with most acrylic paints. Fir cleaning the airbrush I would recommend purchasing undiluted car windscreen wash. Yes that's right windscreen wash. I like to use the apple scented variety as I like the smell but any undiluted screen wash is fine. This is in essence a mild detergent and is great for cleaning the airbrush in between paint colours and after use when you break the airbrush down to give it a complete clean. The best thing about it though is the price; I pay on average around £5 for 2 litres. When you consider that at the time of writing this a 200 ml bottle of Vallejo airbrush cleaner on Amazon is £7.50 or in other words a comparative cost of £75 for 2 litres of Vallejo to £5 for 2 litres of undiluted screen wash; the savings are astronomical. One of the things I would advise that you don't scrimp on is a flow improver. This essentially helps prevent the acrylic paint dry and cake in the airbrush as you use it. For Vallejo it comes in a 200 ml bottle for £10 and although this sounds expensive; I put one to two drops per airbrush cup of paint so a 200 ml bottle lasts a very long time and I do see a difference in quality of finish when I use it.
For the thinning of acrylic paint again there are many options out there and for a while I have used VMS acrylic paint thinner and this is excellent value for money when compared to other manufacturers thinner. I have however recently come across a home made recipe for acrylic thinner. I'm going to use it for a few weeks and report back on this page including the recipe if it all goes well.
To finish
This is a short "how to" at the moment which I intend on adding to and amending over the years. hopefully you found this useful to you and I promise that I will add to this page as often as I can.


No comments:
Post a Comment