
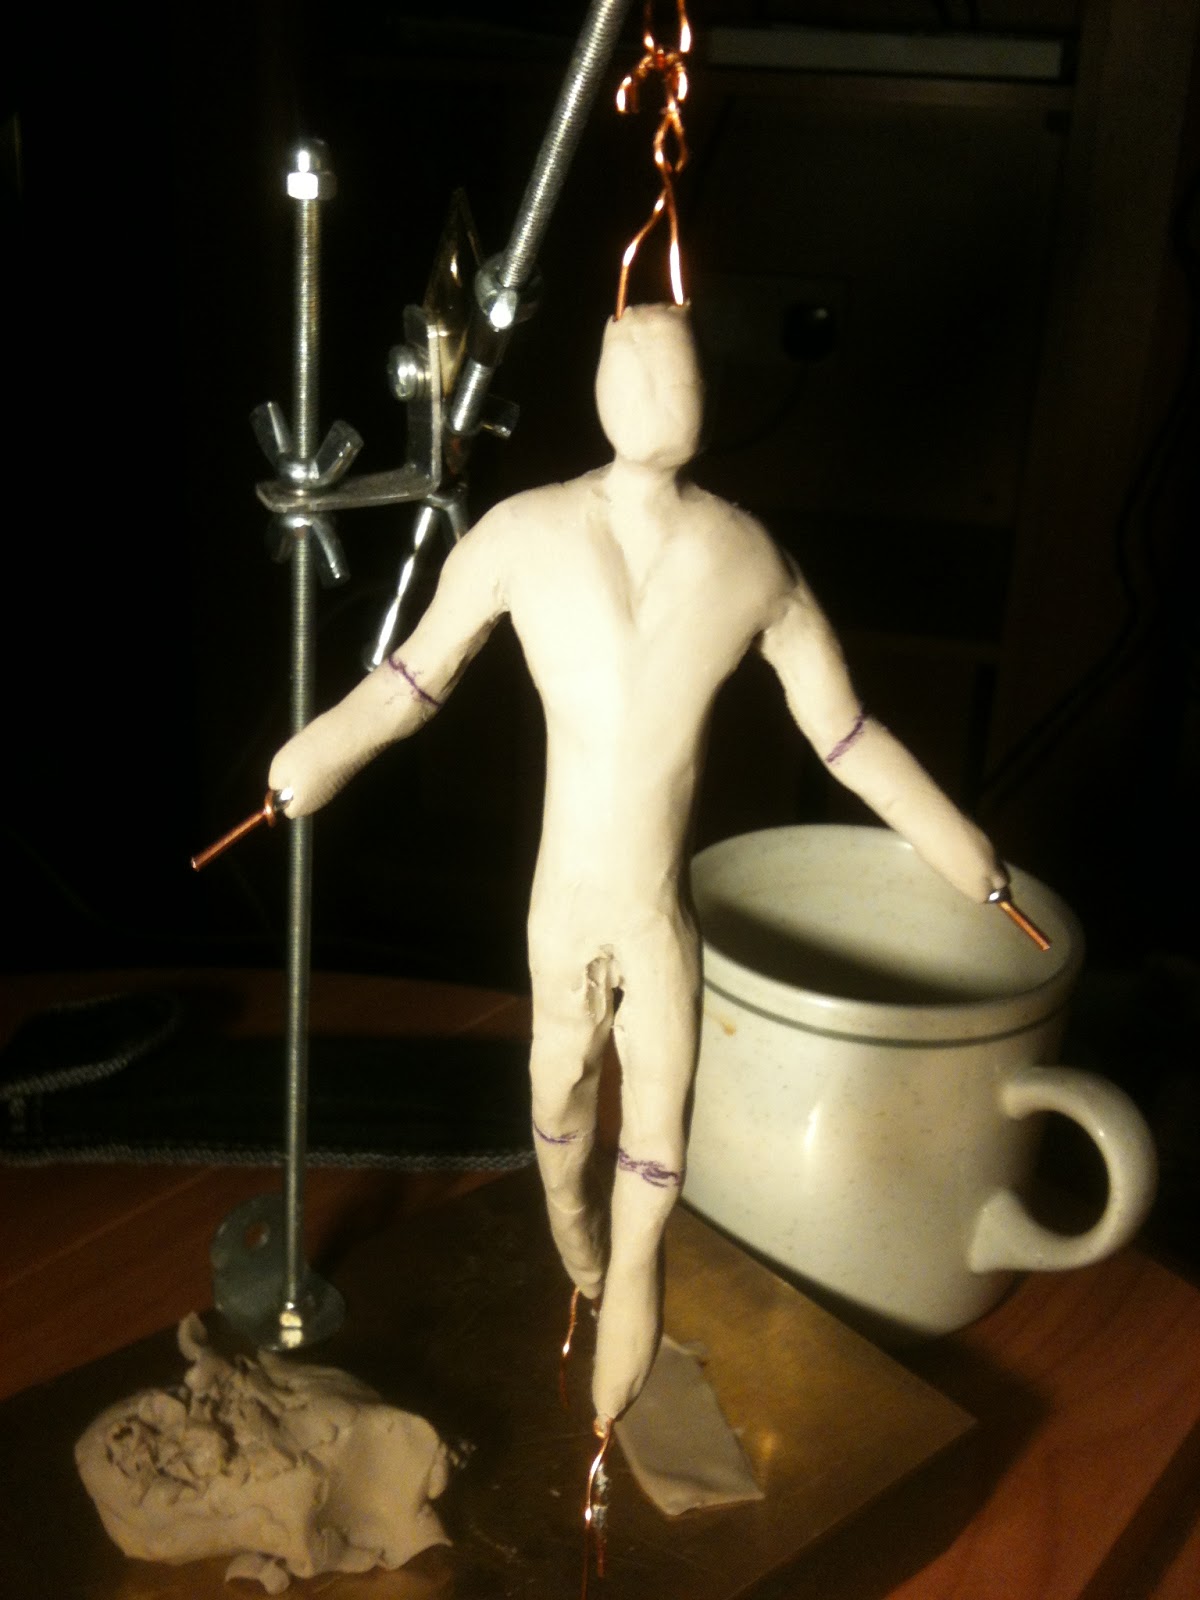
Work begins on this figure sculpt as always with the construction of the armature. I have taken this as an opportunity to write up my first tutorial for my re-designed blog. If your interested in how I make these armatures, then take a look in the tutorial section of my blog. The next stage is the posing of the armature in the rough shape shown in the above photo and then initially "fleshing" out the frame and baking off. Once cooled I will then use my little reference photocopy and mark out the joints of the body to make sure that the bends for the knees and arms are in the correct place.
The Build
OK I would just like to explain that this sculpt has been started while I was on holiday. Yes I am that committed to modelling that I take an "away case" with me that contains all of my sculpting equipment which can be see in the photo below:

First stage as always is the bulking out of the figure and setting it in the correct pose as show in the first photo on this page. I have also taken the unusual step this time of sculpting a very basic head shape at this stage because only a portion of the face will be visible once completed, and the hood is incorporated with the rest of the clothing so I will have to step away from my usual process of body first head last. You will also note that a distinctive "V" has been placed on the chest as part of the initial sculpt to denote the place between the open collar of the outfit and the bare flesh of the chest. I have also placed lines where the elbow and knee joints should be.


At this stage the figure was baked and allowed to cool. I decided that the first stage of clothing to be sculpted would be the belt, as this is the most prominent feature of the figure and it was in my opinion the most logical place to form the rest of the figure around. The sculpting took a four part process for me with the underlying material sculpted first, then the large belt clasps, followed by the laurel wreath on either side of the clasps and finally the buckles in the centre and sides.


With the belt virtually complete, I opted to then sculpt the upper front part of the torso first before moving onto the back of the figure. I usually sculpt around the figure as a whole section but due to the level of detail required for this figure, I opted to section the sculpt and bake before moving on to the next stage. The shirt itself was easy enough to complete, and I decided to sculpt the stitching in for the stripes of the shirt to provide a little definition when painting. I have also sculpted the front portion of the chest belt and added the holes and belt loop/buckle.


I have not encountered any serious problems yet except for the head moving to the right of the shoulder line as a result of the baking process. At this stage its not a major issue as no sculpting has really taken place in that area, so I intend to carve the offending sculpey away and re-shape later. You may also be wondering way I have gone to the trouble of sculpting all of the upper body as a large area of it will be covered by his cape and outer garments. I did originally think of not sculpting and detailing this area , however after some thought I realised that I would have to as it would be more difficult for me to get the proportions correct when I came to sculpt the cape. In addition, I don't know the exact area that the cape will cover at this stage, so by sculpting it all I know everything will be right later in the sculpt.

The back and rear belt
I decided to only add a little detail to the back for the time being for two reasons, one a lot of the detail will be lost with the addition of the shoulder pad and cape, and two, there are not many reference photos of this characters back, so will be using a little artistic license until I can find some reliable reference photos.
I added of course the rear of the chest belt and some detail of the shirt. for the rear part of his belt, I added the straps that are hinted at from the front shot of the character but if I am honest, I am not very happy with the finish and in all probability I will be carving this section off and starting again. More for this section of the figure to be added later on in the post.
The Trousers
For the trousers it looks like he is wearing some form of Elizabethan type trouser that is essentially very baggy at the top and tight fitting under the boots. I suppose that you could also compare these to the Arabic style trouser or that of German officers in the first and second world war. The sculpt of the trousers began by simply bulking out the upper leg to begin with and then simply adding more and more sculpey to the sides until a reasonable representation of the trousers width was obtained. Following that it was a case of using my various tools to simulate the many folds and crease's shown on the reference photo.


The sleeves
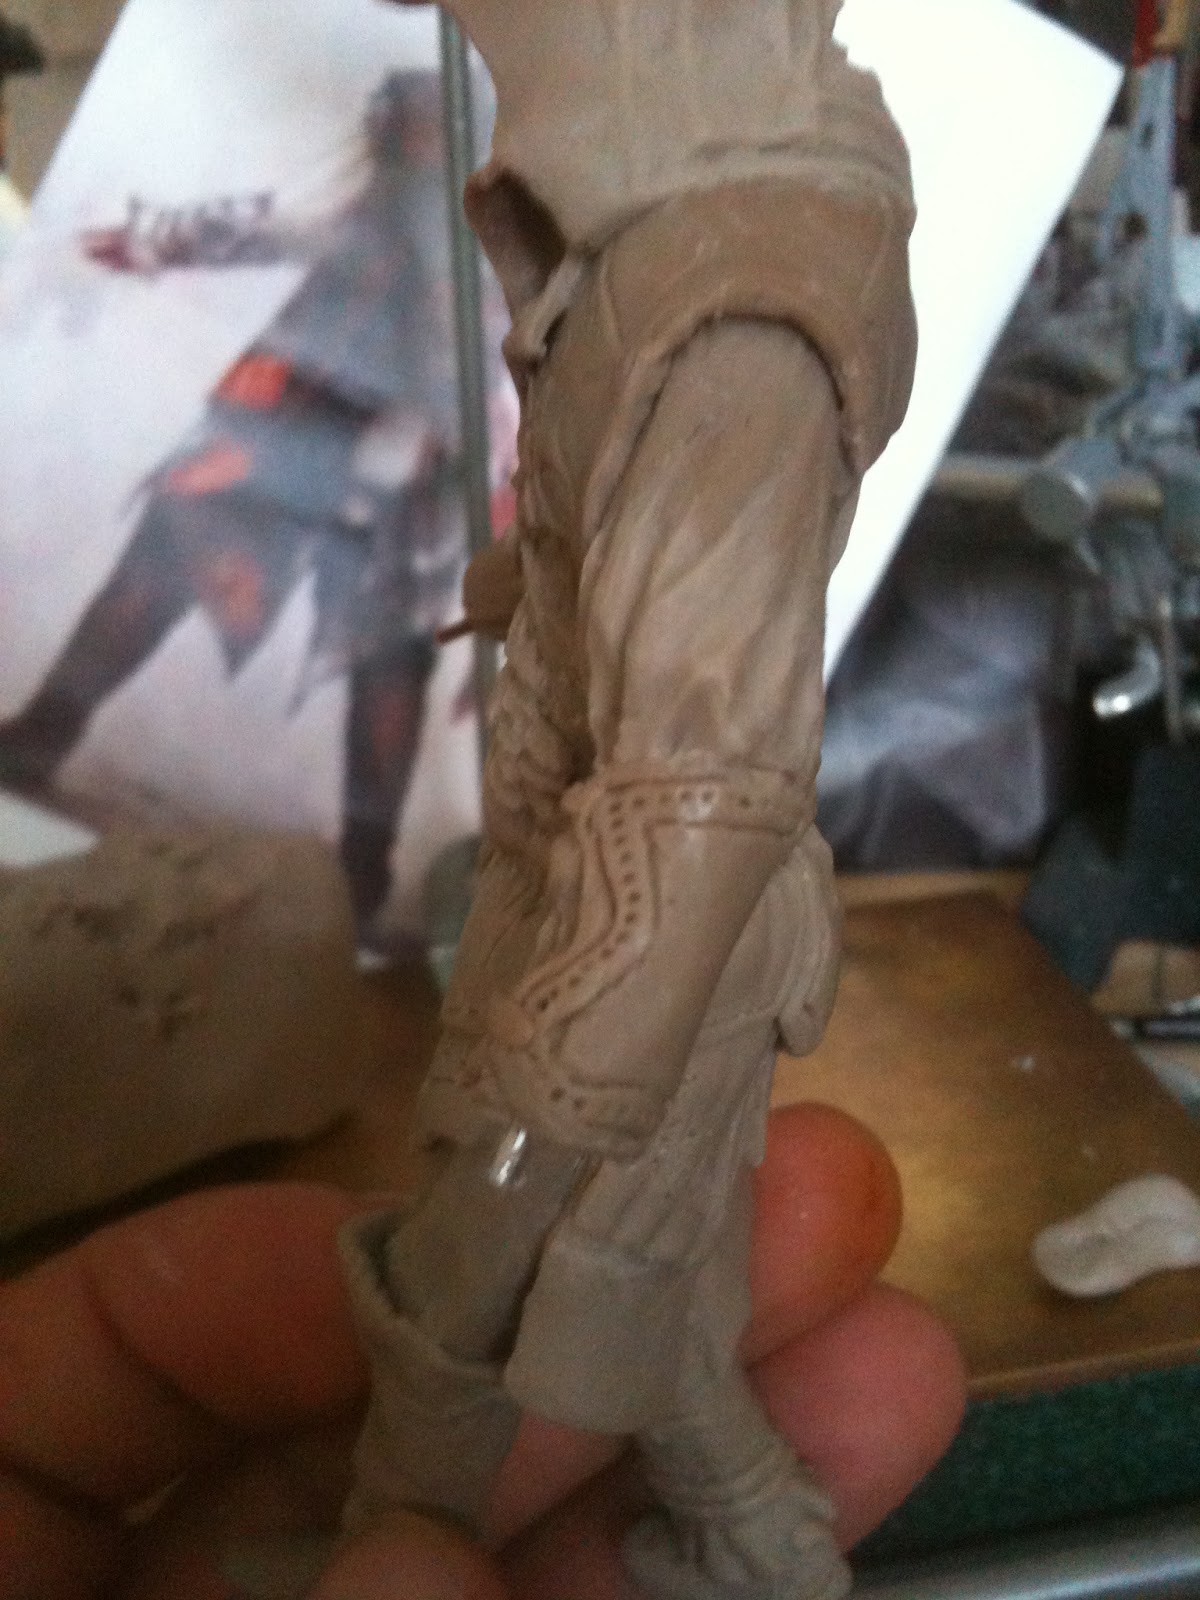
I have opted to start with the left sleeve as this will only come to the elbow as a normal sleeve and then a leather forearm strap and weapon is added. The top half was very easy to sculpt, using the same method as described for the trousers. I also sculpted the entire right sleeve in the same manner and baked them off. I then added the leather armour to the right shoulder and carved the pattern and strap retainers into it before baking. The image shows strings being taken from these straps and I will probably add these at the painting and finishing stage of the figure. I then added the top half of the vest for the left shoulder and carved into it the sleeve design. these were then baked solid to retain their shape and designs. I should also point out that I have also started to sculpt the top section of the knife held on the right forearm.


The Boots
The boots and leather gaiters are if I am honest one of my biggest challenges for this figure as I absolutely hate sculpting them! It takes forever for me to get the proportions right and to make them look realistic. If you look at the photos you will be able to see on the left leg (which I have not yet started), how I started the
sculpt for the left boot. Essentially I carved the baked sculpey back to almost the armature wire and added sculpey to the now bent wire that was soldered onto the leg right at the start of this project. This then forms the basic layout for the boot and gaiter. From there I added sculpey and built the layers until I had the correct proportions. I then used the various sculpting tools that I had to form the shoe, gaiter, straps and shoe laces. Happy with the result. I then baked again to set everything in place. I will repeat the process for the left boot and you will see the results of this further down this blog as I complete it.


Face and arms were next for this figure. for the left lower arm I have now added the leather strap around the forearm and added some detail to it, however I am not too concerned with fine detail fro this as I will be wrapping the cloak around this as the figure nears completion. For the face section of the figure I decided to not to try to make a true likeness of the Ezio reference images that I have being as the majority of his face will be covered by a hood when completed. The face then is going to be left quite generic in appearance and I will not concern myself with large amounts of detail either for the same reason.


I should also point out that I was unhappy with the laurel wreath on the figures belt, so I removed it and re-sculpted this as well. You may have also noticed that the hood as been added to the figure, however I have not yet finished this, and will of course post some pictures once this is also complete.


The hood and cape have been a little bit of a challenge. I think if I hadn't made the Faith & Despair sculpt as a practice piece to hone my skills then I would have had a major headache especially with the hood. To get the correct shape for the hood I found that I had to do it in two sections; the hood itself and then the pointed portion after the hood was baked. By doing it this way I was able to get the correct shape with minimum problems. The cape was made in a similar way. the major portions were made in two sections and after baking I added more sculpey over the cape to provide additional definition and folds. I have also roughly sculpted the hands and will clean these up with needle files and emery paper. All that is really left for this figure is to complete the belt buckle (again) make the knives and shirt cuffs, re-finish the rear of the belt and add little details hear and there. I've put four pictures up below of how he stands at the moment and will post some finished sculpt pictures quite soon.


Sculpt Completion
Well that's it ! the sculpting phase of this project is now complete. In all honesty this sculpt did not have any major problems. I had to make a few alterations on the way though, some of the major ones were the dimensions for the left arm as shown above, others include a re-work of the belt buckle, re-work of the back, re-position of the left arm and finally re-making the left hand following an incident getting the sculpt out of the oven! the last stages that were not photographed during the process was the hands, cuffs, re-work of the back and the completion of the cloak and belt buckle. All of these details however can be seen in the final sculpt photos below. I also came up with the idea to use heavily sanded cocktail sticks as the blades, which once painted should look quite realistic. The only additions to the figure that I have not added at this stage are the belt extensions and the ropes around his chest. These will be added in the painting stage which is to follow.


First stages for the paining process is the preparation. This includes some light sanding in some areas to remove the sculpting marks, some light filling with the squadron green or white putty and then priming in grey primer to identify any areas that need further work and of course to provide a surface to paint to. For the base coats I will be using the usual Humbrol enamels and once dry will provide light and shade with oils. I have however decided to try something new for the base that I will be mounting him on. I usually mount my figures on a white plaster base and paint it to look like wood or in gloss black. I have been reliably informed by my brother Mike who plays this game, that the setting he would expect to see Ezio in would be a very old school Italian type setting. So with that in mind I set about finding a suitable image of Italian style tiles to glue onto the top of the base to simulate an ornate floor. For the rest of the base, I decided that I would attempt a natural marble finish. With no real idea how to do this I trawled the internet for some suitable guidance. the page that I found was very informative and although I had to alter the process slightly as I would be using enamels and oils, I stuck to their instructions very closely.( link for article used ) once the effect was complete, it was a simple case of giving the whole thing a couple of coats of klear for a nice glossy finish, and base complete!


Once the figure is complete and mounted I will probably add some light rubble and dust to the floor for effect. For the figure, once it has been sprayed in primer and filled where necessary, I will use a combination of Humbrol and Xtracolour enamels in the first instance, followed by a wash in Klear, then onto the oils. I have also been searching for a suitable medium to represent the two cloth sections depicted in the original drawing that I had, fluttering in the breeze from his waist. After many nights of thought, the solution presented itself whilst building my 1/35 aerosan dio. The remaining brass from the photo etch sheet provided with the kit would be the perfect solution to give the impression of material flapping in the wind, had the right thickness and the right rigidity to remain in place. the following photos show Ezio in his base colours before any oil paint is applied.


The oil painting itself will be done in various stages to avoid too much intermixing of the colours, make it easier to handle the figure and lastly because I have other projects on the go as well, so I will be dividing my attention between this and other models.
OH NO !!!!!!
Its been a long time since I updated this figure and for good reason unfortunately. I encountered a problem with the paints that I used for the figure. They simply wouldn't cure no matter how long I left them. The result was a very sticky figure that was in the end not worth carrying on with in its present state. I have finally given up hoping that the paint would miraculously cure overnight and stripped the figure of all paint. Once stripped and cleaned I re-attached some of the sculpted pieces that came off in the stripping process and have re-primed the figure in Halfords acrylic primer. Once I am sure that the primer has fully dried, I will re-fill and sculpt any damaged areas and continue once again to complete this figure. It doesn't happen often but major set backs are unfortunately part of this hobby. The following pictures show the current (backwards) progress.


Work Re-started
Ok its been a while for an update on this sculpt and to be honest with you, I have not made any progress to date. Quite simply, everytime I considered doing something with it, I would take one look, get depressed at what had happened and place it back in the storage box again. This time however, I removed it from the storage box and decided to take a big swallow and re-start it with a fresh outlook. Not someone to dwell on the past too much, I decided that this would not just be a repair job, but also an improvement job on what I have already produced. I looked at the sculpt and decided that there were a number of things that I didn't like about it as well as a number of "design flaws" that would need to be rectified. This next section of the post shows what I have done to the figure to date and how I have (hopefully) improved the overall look of the piece:
The major jobs that I have so far are the re-sculpting of the hands which broke off in the paint stripping and doing something with the left boot which keeps on cracking at the join between the boot and the leg. I was also never really happy with the extravagant belt buckle and the left arm knife holster so I decided to strip these sections of the figure:


As I started to remove the damaged sections and re-sculpt the parts, I also decided to remove and re-sculpt the left shoulder leather cape pad as I was also never really happy with the look of it. I always thought that it needed bulking out a bit and that it needed to be extended over the shoulder a lot more.
I addition I decided to simplify the knife holster on the left hand and to make the leather band, more chunky as well. The crack on the left boot was also carved out slightly and re-sculpted:


At this point I have now re-sculpted the belt, the shoulder pads on both sides, the boot and the hands including cuffs and holster. In all honesty I could re-prime the figure and start painting at this stage, However I was still not happy with how it looked. There was still something bugging me about it. It somehow didn't look exciting to me. I decided to employ the greatest skill that a modeler can have, STARING yep I stared at this for hours, I drank copious amounts of coffee, smoked a lot of cigarettes and did even more staring until I realised what was missing! If you look at the image on the left, you will notice that the ties on the belt are seemingly flapping in the wind as Ezio walks, however the cape is draped over his shoulder and back as if he is standing still. This looks absolutely fine in the image that I based the figure on that can be seen right at the top of the page, however when this figure is looked at in 3D, it just doesn't seem right. So I continued to take bold steps with this figure and removed the cape completely. I am also very thankful that I sculpted this figure in stages so that when the sculpted cape was removed, the majority of the clothing underneath it is already sculpted (phew).


To keep the cape itself in the air so to speak, I drilled the backe of the figure and inserted some thin copper wire in strategic places. This is in the hope that I can bend them in roughly the right position to support the sculpey that will be rolled thinly and laid over the top of the wires. Once positioned over the wires I will add more scupely to the joint between the figure and the cape to fix it into place before baking.:


I have decided that I am going to limit the variations in paints and finishes that I would normally use on a figure like this to avoid any risk of the paints not curing again. I don't mind so much because the figure is based on a computer games character so the colour finish I suppose could be expected to resemble a clean computer image rather than a real person. Well that is the excuse that I am going to use for the lack of shading in some areas of the figure!
The re-paint
For the re-paint I ensured that I had a good 2-3 coats of grey acrylic primer applied to the entire figure. this was allowed to dry for 48 hours until any other coat of paint was added. Basic colours for the figure will be Humbrol and Revell enamels and each coat will be given 48 hours to cure and harden before another is applied. (I'm not taking any chances this time). The figure is also going to be periodically washed in a mild detergent, rinsed and allowed to dry fully to ensure that no other contaminant could effect the curing of the paint. This is the figure following a re-paint in basic colours:


So far the paint has cured perfectly. Its going to be difficult to decide what to use oils for and what to leave. I will be adding highs and lows with oils to the cape, boots, trousers and leather. I will be leaving the tunic, arms and belt fabric as these were the problem areas before. I will also be adding additional details to the outside of the cape such as braiding and buckles to the boots, etc. I think that I will also change the inner cape colour to something a bit more eye catching. More updates soon
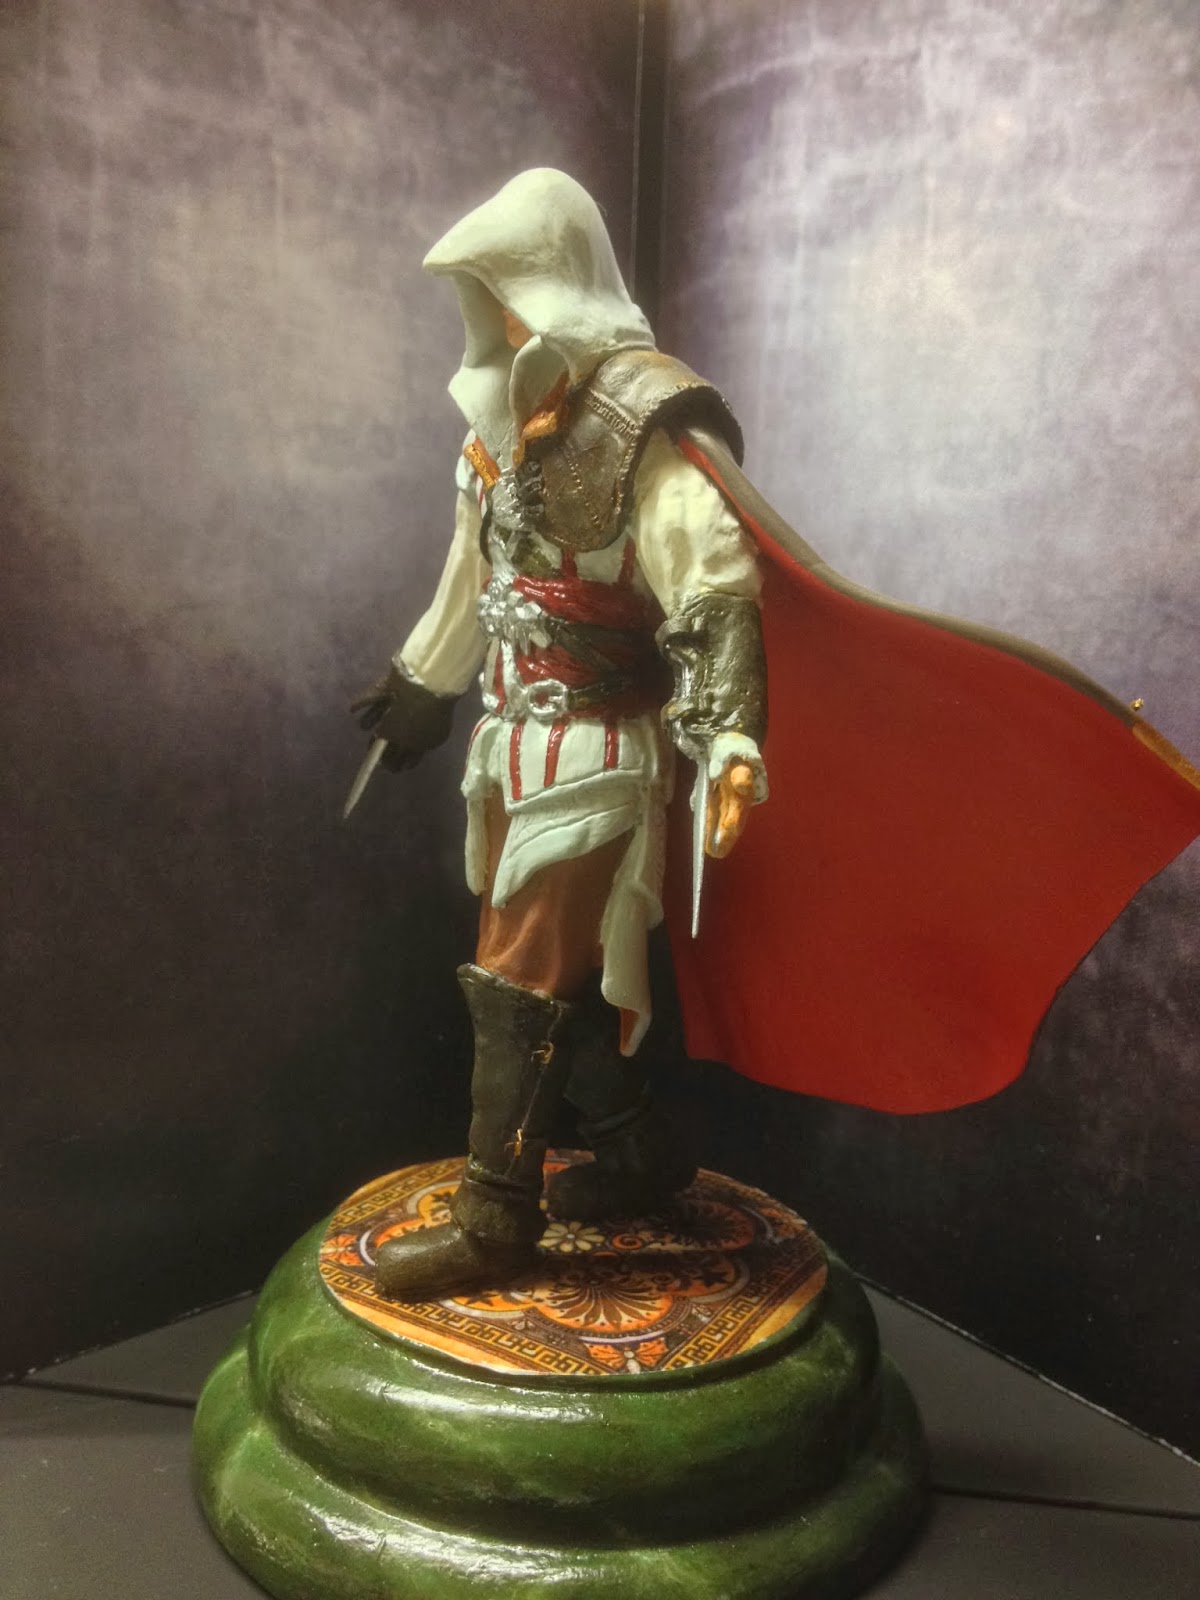
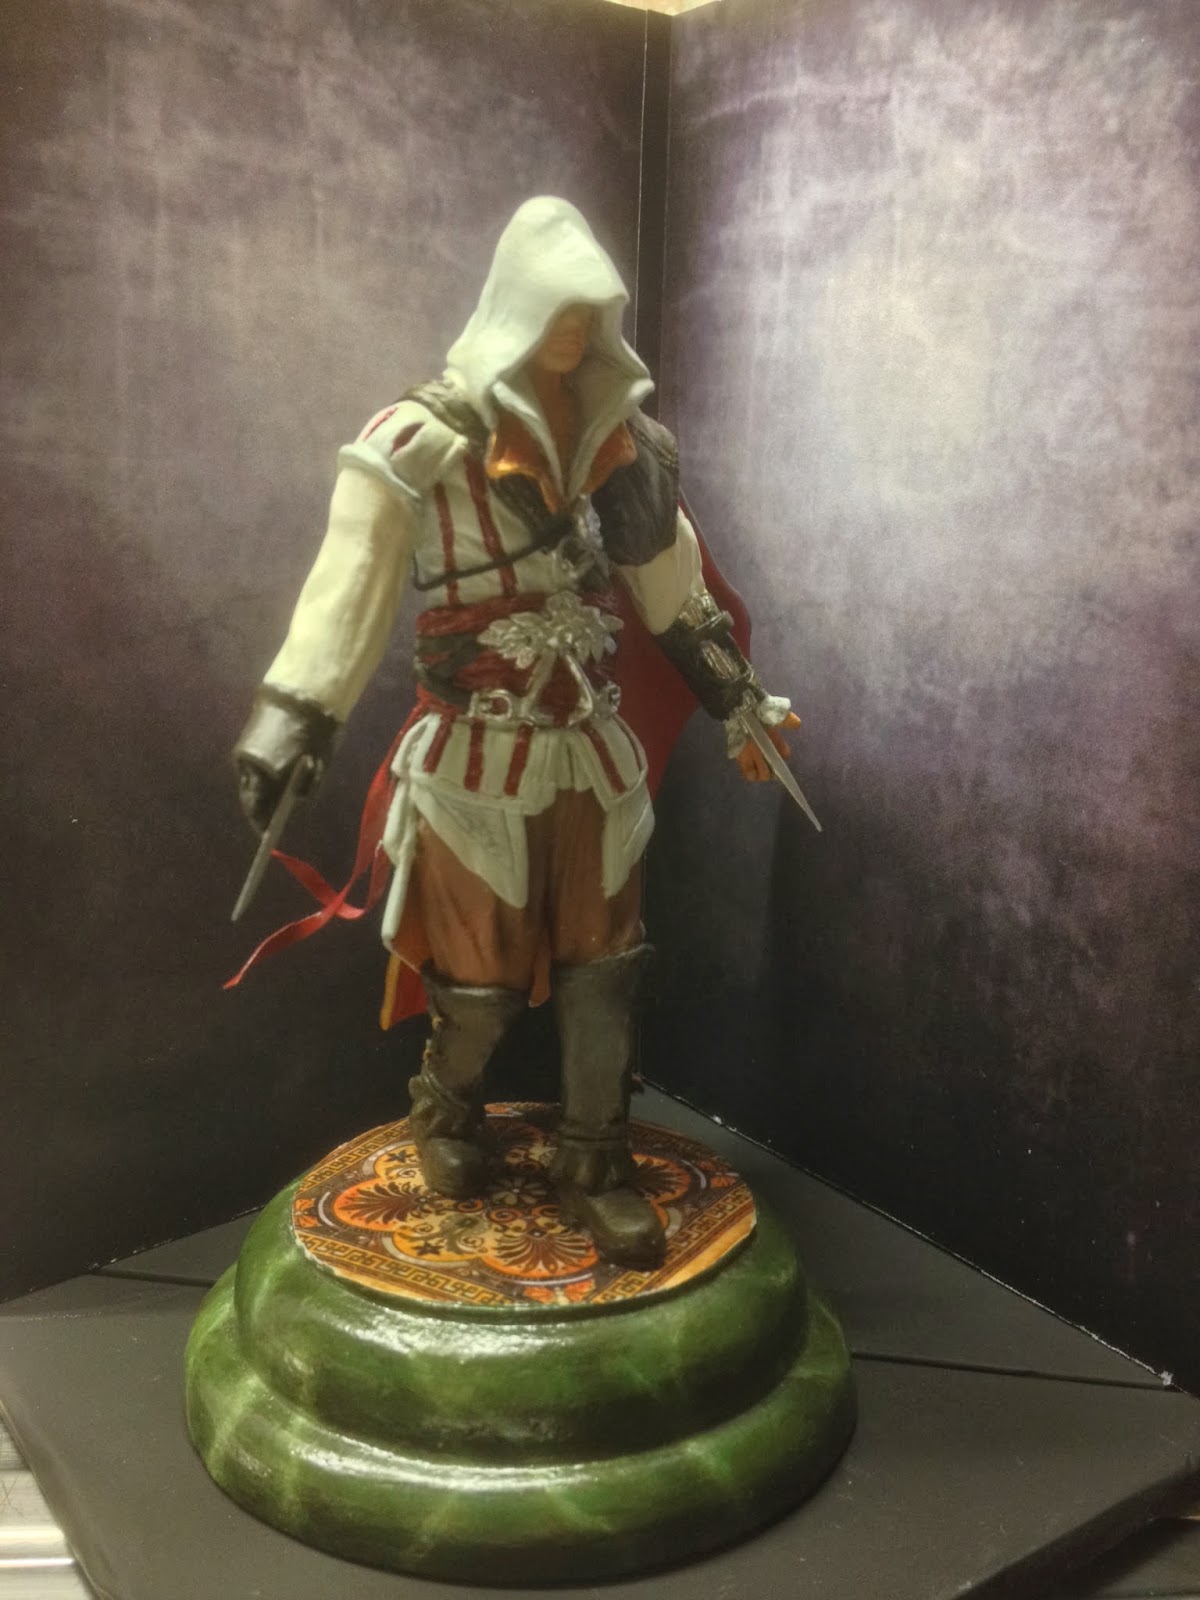
Well I'm on the home stretch for this figure ( and its been a long journey too). I decided to go for a crimson red for the inner cape, some brass picture wire for the lower part of the outer cape and then painted it gold underneath the wire. The Leather components were highlighted in yellow oils to simulate wear and the skin was also treated to some oil work for a little tonal quality. I know that I could have gone overboard with the light and shading for this figure, but he is after all a video game character so should he represent real ife perfectly?
As for some of the down sides to this figure for me. The worst part I suppose is the hands. This one of my current weaknesses as far as sculpting is concerned and I will endeavor to improve this for my next sculpt. The face could have been worked a little better and I was never happy with the final position of the right foot. These are all things that as a person new to the sculpting world I look upon as something to be learned from and I'm not too concerned for this figure as I'm really happy with how it turned out in the end. Here are a couple of finished shots and I will be adding some more photos of Ezio with my daughters friend Ethan who started this project off with a twitter conversation that I had with him. I hope that you have enjoyed reading this post and I would love to hear your thoughts as always.


Brilliant work, Craig! I'm impressed by your sculpting ability
ReplyDeleteexcellent piece
ReplyDelete