Introduction
This is a model that I just had to have when I saw it built in Airfix magazine (Jan 22 issue). Its a Gecko models 1/35 scale kit and although I have not previously built something from this manufacturer, the write up speaks of the high quality of the kit and ease of building it. There are several variations of this model available and I was originally considering the airborne forces version because it looks better with its additional framework and armaments however; after looking around the internet at photos of this in use and considering that many model makers will have the same initial thought as me (the fighting version) I settled on one particular photo that shows British soldiers in the Gulf using the Supacat as transport in and around the war zone and it was the "basic" version, not the "fighting" version. Decided on what version of the kit I wanted; I placed an order with my daughter for the model as a Christmas present and on the 25.12 I was greeted with the kit under some wrapping paper (Thanks Lauren).
The model
As I said in the introduction; I'm going to use the basic version of the Supacat to portray a simplistic scene from a photograph found online. Here's the kit box and the image I am basing my little diorama on:


The kit itself is amazing quality and the instructions are the coloured "cad" type. I still haven't formed a complete opinion on these instructions. This the second model that I have built that uses this style of instruction over the "traditional" style of instructions that you normally get with a scale model. On one hand the instructions are very clear however they are produced by a technical drawing programme and while I am comfortable using this style of image because of my job (I'm an engineer by trade), I do find the traditional style of instruction a little easier to use because of their pictographic qualities. This may be because I've spent over 20 years using them or it may just be that the traditional instructions are better? Anyway; back to the model: The kit is superbly made and the details Gecko has managed to reproduce in plastic are really impressive. The plastic is quite soft so it has to be handled with great care. There is a lot of photo etch to contend with for this kit and while it provides some amazing detail like the tread-plate, if you don't have a photo etch bending tool you may struggle with some of the brass parts.


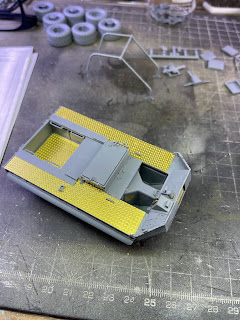


Building the kit unsurprisingly did not take long because of its diminutive size, however don't let the size fool you in terms of the price asked for this. At between £20 - £30 pounds for this kit it does seem a little on the expensive kind but when you take into account the quality on the kit parts plus an entire etch brass fret as well I would consider this as a kit that's good value for money. Be warned though; the parts are small, easily snapped if your not gentle and soft, so careful with that glue as well!
Painting
Painting the model began with using Vallejo light grey primer on the vehicle and Vallejo black primer on the wheels/tyres. I also used the black primer to pre-shade areas of the main vehicle as well. Once sprayed I allowed the primer 24 hours to completely cure as I have found that this produces the best results for a durable finish with Vallejo's primers.


For the main colour I have chosen to use Vallejo's UK light stone and progressively add some signal white to the upper layers of the vehicle (misted on with the airbrush). What I also like is the fact that in the image that I am modelling the scene from; the tyres have some significant over-spray from a rush job to change the colour from green to sand? Whatever the reason it made my life a lot easier without worrying to mask the wheels from the tyres to spray them! Once dry, the whole model was coated with Vallejo matt varnish and then the areas that required decals were given a quick coat of gloss.


The figures


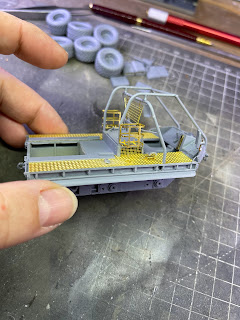
Once I think I have achieved what resembled some natural poses I then primed all three figures and mounted them to my temporary bases for colour and weathering. I also started to build the storage onto the Supacat into positions that closely resembled the image and looked OK from all angles:


The Base
For the base I decided on using one of my Ikea bargain £1 frames. They are really small and compact and I originally bought them for the various 120mm figures in the "stash". This vehicle is small enough to comfortably fit on the frame and being as the image shows the Supacat in a desert setting, the base will be a simplistic sand finish. To prepare the frame I simply take out the card and plastic and glue the backing in place permanently and then cut the card and clear plastic to fit the hole and glue that into place as well. This raises the picture area up in the frame and with a little balsa sheet glued on top of everything It provides a great substrate for the application of a generous layer of mod-podge and kiln dried and ground light earth that makes a great sand finish. This is allowed to dry overnight and the base is effectively ready for the Supacat. The whole base was then covered with a very generous amount of dried light earth and mod-podge and while still wet; some cling film was laid over it and the Supacat wheels pressed in to make some indentations.


Loving this build, and the write-up. Did you ever post the final pictures anywhere?
ReplyDeleteHi. I am so sorry. I completely missed your post and I forgot to take photos of the finished model. I will try and take some shots of it in my office and upload asap
Delete