Introduction
This is my first figure sculpt in around 5 years. A combination of other projects, time and inspiration have stopped me from making a sculpt. This is until I saw a figure sold by a small model company. I was immediately drawn to the style and obvious artwork that had gone into the piece. I had considered purchasing it but when confronted with the cost and size I was a little put off. It would be unfair to say that it was overly expensive when one considers that the model is 1/8 scale and it has been derived (as I later found out) from a Canadian artist by the name of Derek Stenning. A little bit more research led me to finding out that he had a published work called the EK series that was all the same theme albeit a number of different characters. Unfortunately it was a limited run and finding a copy of the book was next to impossible. Fast forward a few years and my daughter managed to find a second hand copy of the book in amazing condition for my birthday. I was an extremely happy pappy that day!!
*warning* the next paragraph contains a rant!!
I have not included a link to the model companies website as I usually do, nor will I publish its name as they have decided that they will not ship to the UK because they are obviously unhappy that the UK has left the single market and the company won't comply with the new UK tax laws citing "not our job". It wasn't the model making community that made the decision to leave the European single market and we didn't decide on the tax laws! Why this company thinks that by excluding an entire community from their product will make any difference is beyond me especially when they will ship to any other country in the world! Does the rest of the world think that all British people are all xenophobic and agree with every decision their government makes and should be excluded accordingly or is it just this company??
OK that's my rant over with and please accept my apologies; I'm just sick of BREXIT and everything that goes along with it. While I know that my opinion will also make as much of a difference as this company's opinion (none). I do now feel better for putting my thoughts into words!
Back to the sculpt!
I waited a little while (6 months to be exact) before starting a sculpt from the book as I had other projects that I wanted to finish before dedicating my time to this. The particular figure that I liked is entitled "Insolent mockery of the divine under centrist rule". The title I know is a bit of mouthful but thankfully the artist chose the English translation of the original title in German as this was a little longer and I don't think I would enjoy trying to type it a few times in this post. I was also met with a minor disaster when I went to the attic to retrieve my sculpting equipment (see this post for what I use) and realised that I had unintentionally included a brand new block of sculpey firm when I placed everything in storage; this resulted in it completely baking off in the heat of the attic! Fortunately Amazon came to the rescue with a reasonably priced block in 24 hours; phew!!
Starting the sculpt
Like any sculpt; I started off with the construction of an armature. I should point out that I am not a trained figure sculptor and have learned from a few very good books that I have bought over the years and a great many You-tube videos by some very talented people. I had previously made my armatures from copper wire but this time I invested in some aluminium alloy armature wire for the job. I also opted to "bulk out" the armature using some crushed aluminium foil rather than Sculpey. This resulted in a much lighter frame and far less Sculpey being used. I made a short tutorial a few years ago on how I make my armatures here if your interested.

after the armature had been completed to the right size and approximate dimensions (1/16 or 120mm scale) I then began to work out the pose of the figure that I wanted to sculpt. With the pose complete I then applied a very thin layer of sculpey over the torso and limbs and then baked it off to set the pose. I have included an image from Derek Stenning's book for reference however I will not include any other reference images that I used from his book as this would be both a copyright infringement and let's be honest; insulting to the artist as I would be essentially publishing a large amount of his work without permission.

I suppose I should try and explain what I like about this particular artwork over the many other amazing images that he has produced. The simple answer to this is that I don't know! There was an intangible draw to this image for me from the start and after several hours over a few days dedicated to deciding which particular image I was going to emulate in a sculpt, I kept coming back to this one. I suppose if pressed for an answer; I would say that I liked this one as it would eventually make an eye catching sculpt as I will be creating the "wall" as a backdrop and as a means of mounting this figure although this isn't the only reason why I chose this one first.
The initial stages of any sculpt for me is the blocking out and getting the proportions right. For this sculpt I also added the helmet ring as it was a large chunk of the figure and would provide an additional reference point for me. Since my very first sculpt I have always used an exact size 120mm template that I printed and laminated to set up distance measurements with a set of dividers. This is a fantastic way to keep track of the proportions of the figure and if you are considering trying your own figure sculpt I would highly recommend you use something similar to help. I've included a few photos of the initial blocking out to hopefully explain the process that I go through.

Satisfied that I had the proportions right after several back and forth's with my dividers onto the figure and template I then began to add some initial details. This is something that I feel I have to do to kind of ratify the sculpt in my mind as being on the right track. This involves many of the creases, seams, items being placed very crudely onto the figure; the intention of removing them in stages and replacing with a more accurate, refined item as I go through each stage of the sculpt.
just to make my life even more "interesting", I also decided to try and make a video of this sculpt at this point for a You-tube channel that I am thinking about creating. I watch and subscribe to a number of model making channels on the site and have never really considered making a video myself until I was forced to learn how to do it due to COVID-19 and my job (I am a university senior lecturer if your new to my website). After almost a year of teaching online and recording my lectures, making instructional videos etc I thought why not give it a go for my hobby as well? I have a very basic set-up that includes a 1080p webcam, a webcam stand with a directional light and the Chromebook that I use exclusively for my hobby. I don't know how successful my endeavours will be but if I manage to splice together a video that is OK I will post a link on this page. Here's a quick image of my current "recording studio".
So; back to the sculpt: The first piece of the sculpt that I decided to concentrate on was the three large packs on the figures chest. Normally I would leave these until last but because of the size of these I thought it prudent to complete them first and bake them so that I could begin to shape the rest of the figures torso around them without fear of them distorting. Once I was happy with the packs I then what I call "flash baked" them using an old card making tool of my daughters; a "heat it up embossing powder gun". Its essentially a hand held heat gun and its perfect for quickly creating a cured skin of sculpey onto a piece that I am sculpting. I will point out that this is a baked skin only and it will need to be baked fully in an oven once everything is assembled. I also place the piece that I am flash baking on an old wall tile to protect my desk from residual heat. Here's a link to a similar style of gun if you'd like more info on it:
amazon link
I then began to refine the creases and folds in the space suit by adding rolls of sculpey and blending them into the section of the body that I was working on. At this point I will also say that if you are considering having a go at sculpting with sculpey then I cannot recommend enough the purchase of a pasta maker. I bought mine second hand off E-bay and use it every time I sculpt. Its a must to "condition" the clay prior to sculpting with it. The action of running the sculpey through the rollers several times really ensures that the clay regains its elasticity and its so much better to work with. It also has the added advantage of being able to produce some really smooth sheets of sculpey in various thicknesses that are just great for creating clothes, capes etc when you need it.
The first details of the figure that I started to refine for this sculpt was the arms. The choice of what part of the torso I work on varies with each sculpt that I make. After one of the arms was completed I removed any "blocking out" sculpey near the completed arm to ensure that it didn't accidentally bake it and then I flash baked the arm after giving it a brush with some baby oil. A sculpey purist will of course say that the sculpey should be brushed with some sculpey solvent to remove any finger prints in the clay but I find that baby oil does the same job at a fraction of the cost of the solvent. I also wrap the rest of the body in some baking foil to shield any uncured sculpey from the heat. With one arm complete I then proceeded to sculpt and complete the second arm and repeat the same process that I have just described. I also want to point out that the covering of the sculpt with foil only works with the heat gun. If you bake in the oven then everything bakes regardless of being covered in foil or not.

I won't bother describing the sculpting process for the legs as its pretty much the same process as the arms however I will talk a little about the preparations for the leg sculpting. While sculpting the arms I discovered an issue with using foil as a bulk material in the sculpting process. The thin film of sculpey that was baked over the foil does not contain much strength and as a result of handling the figure during the sculpting process it cracked and crumbled quite easily. While it would be easy to add some more sculpey and re-bake, the problem of cracking would remain. I had decided to purchase another sculpey product for this project called bake and bond. Its essentially a product designed to glue and strengthen sculpey parts to one another. It remains uncured until baked along with the sculpey and then provides a strong, permanent bond. I opted to fill the cracks with this before adding the replacement sculpey. The results I can honestly say were great. The joint was a lot stronger and it really bonded the sculpey layers together. This is definitely one product that I will continue to use when I sculpt figures in the future.
The body of the figure is proving to be a little more difficult than I first envisaged. This is primarily due to the ring around the neck. I'm not confident in my abilities to create a perfect circle using sculpey and being is this is a large component its something that I want to ensure that I get right. I think however that I have a solution to this problem. By my reckoning the ring is approximately the same size as a readily available PVC pipe used in plumbing installations. I am also fortunate to find a supplier of this pipe on E-bay who sells samples of this pipe for a few pounds. While I am waiting for my pipe sample to arrive I worked on the lower half of the torso that won't be affected by the addition of the helmet ring. The first stage in preparing the body was to use my cordless grinder and a fine bit to score some diagonal patterns in the existing baked sculpey to allow the fresh sculpey a surface to hold on to and not slip around on the hard baked surface.

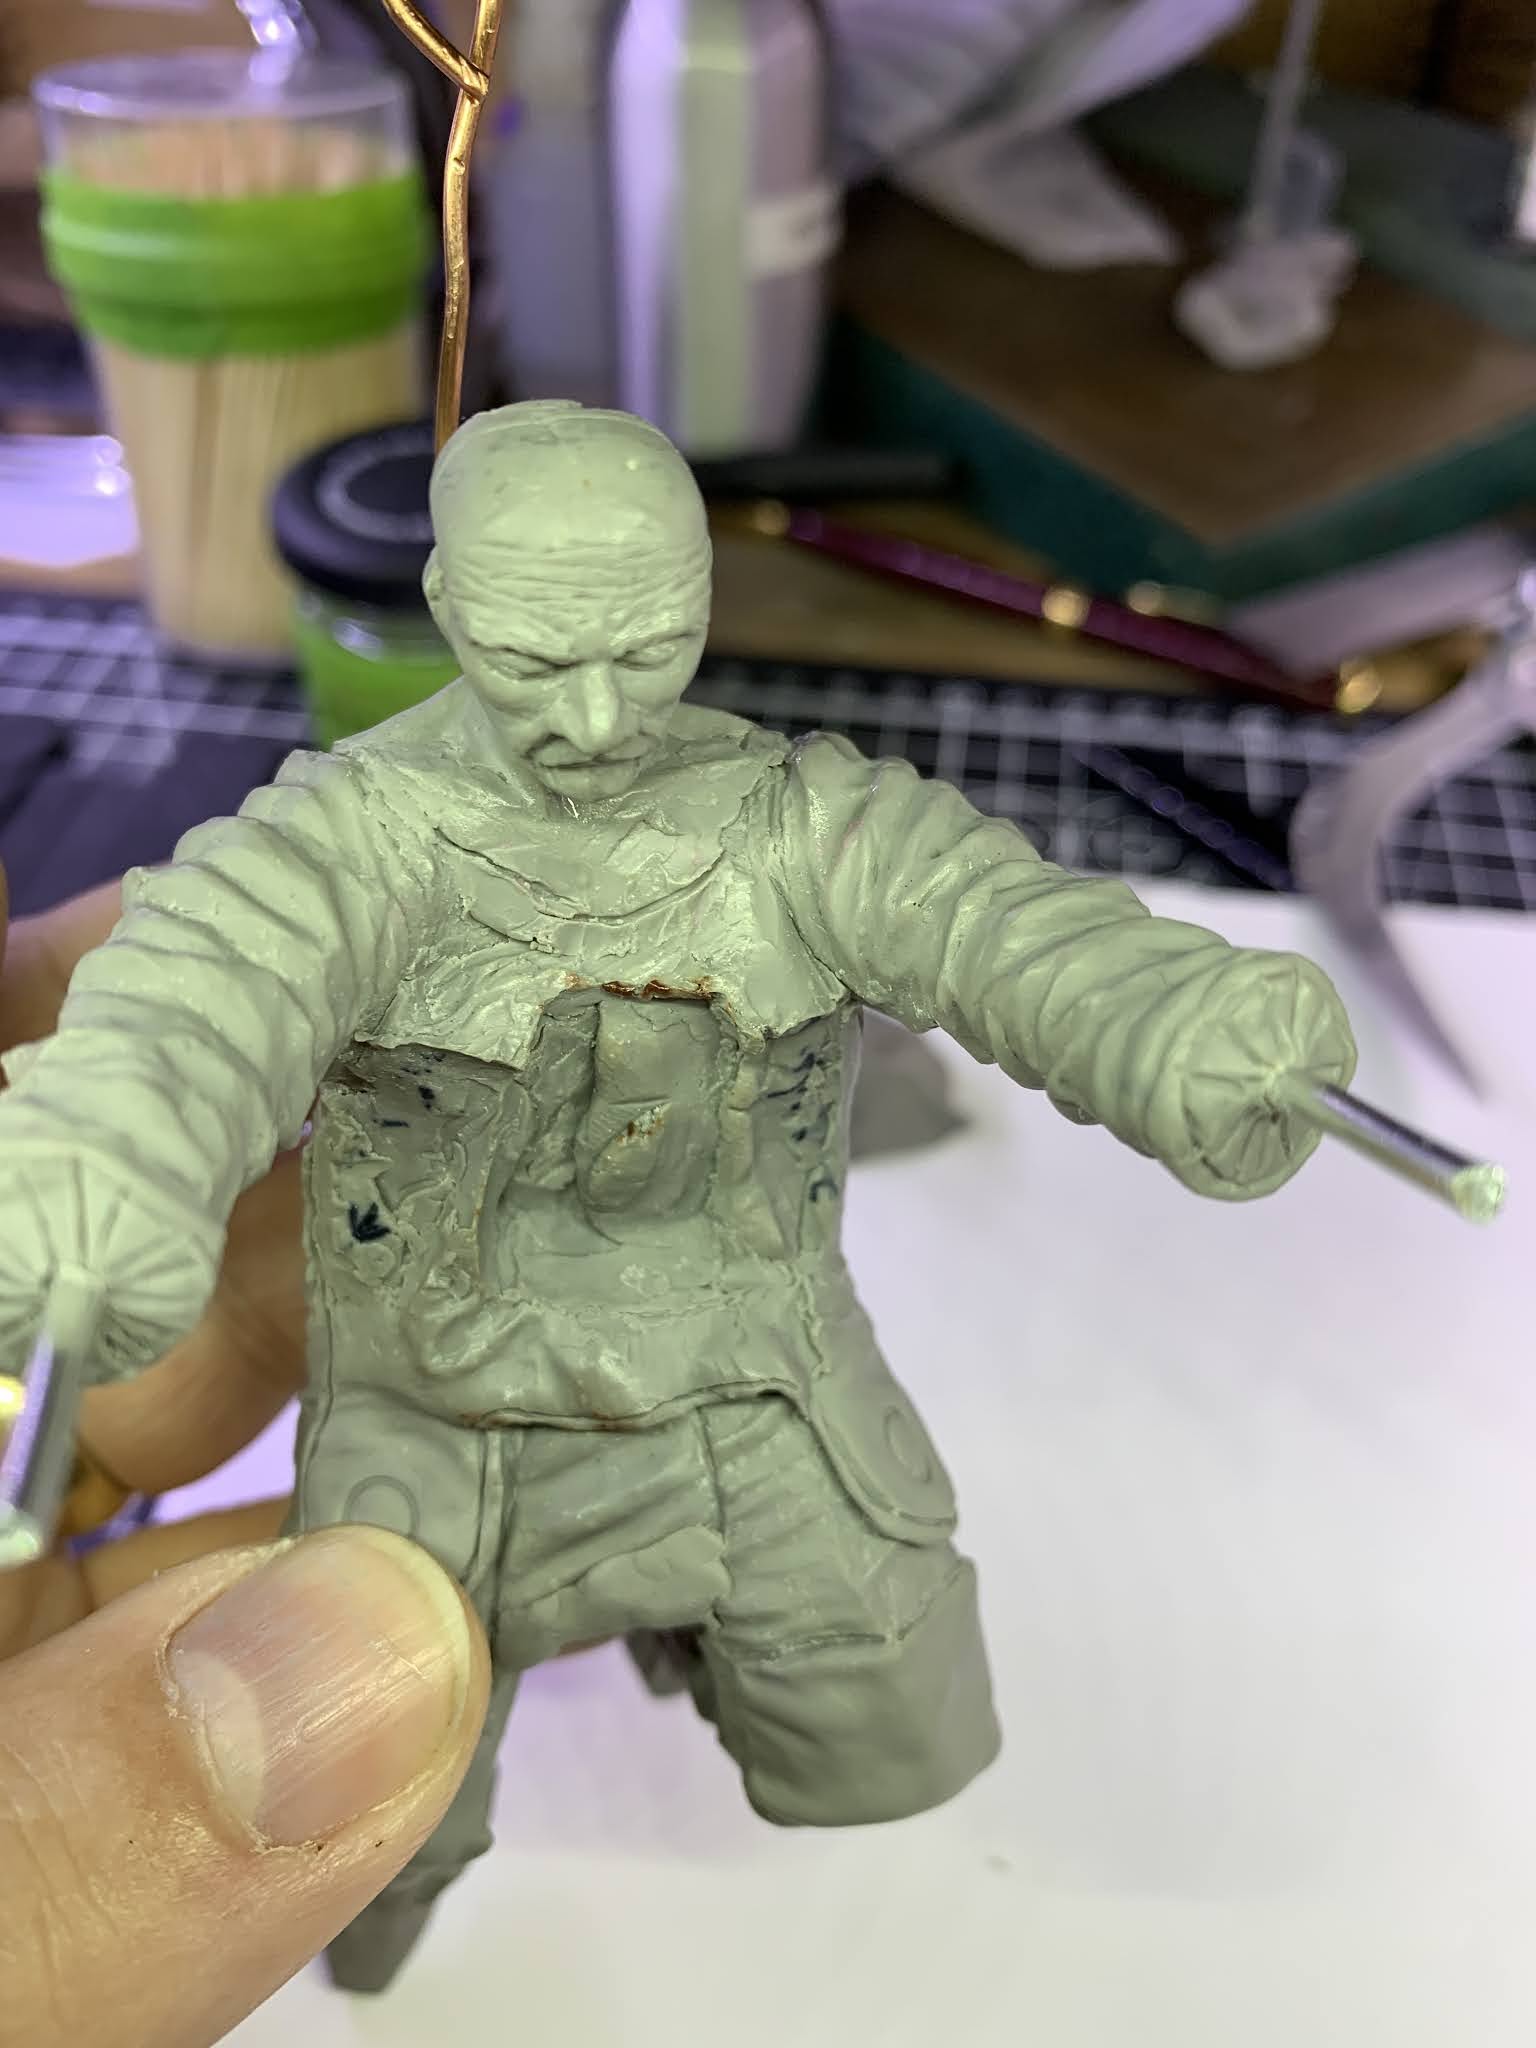
I built up sections of the torso to begin with only ensuring that I had the right proportions in relation to the legs, arms and the arse! The arse on this particular figure was quite difficult as I wanted to portray a baggy space suit as per the illustration however a large portion of it would need to be flattened in order to make the figure easier to mount onto the backing plate. I also had to make several attempts to get the crease lines in the suit accurate enough to replicate the pose of the figure yet remain aesthetically pleasing as well. Those of you who regularly read my posts will be familiar with my tendency to forgo 100% accuracy for a more pleasing result. This figure is not an exception to this "rule". You will probably also note from some of the pictures a cocktail stick in the figures back. This is a temporary reference for the mounting hole on the stand that I am building to mount the finished figure to. At this point I have not figured out just how I intend on mounting the finished figure but I'm confident that I'll think of something!

I will admit that my sculpting weaknesses are the hands and feet. I really can't explain it other than saying its a mental block for me. The boots on this figure are very slim and contain a deceiving amount of detail. I; as usual was not looking forward to sculpting these but I made a start none the less. The first thing that I normally do is cut and shape the armature wires to the appropriate length and then add some sculpey to block out the shape of the foot and then bake. This then provides a stable structure to build on and the required detail. To provide a little distraction I put on one of my favourite films in the background and made a start. Surprisingly the first foot went really easily with no "do-overs" and more importantly; very little foul language!! Deciding I was on a roll I immediately started on the other foot and completed both of them in one sitting. The only issue that I suppose I did have was this sculpting session began at 10:00 pm and finished at 3:30 am !
The next addition to the lower torso is the apron? its essentially another piece of cloth that sits under the chest packs and also has two orifices; one in each thigh. I temporarily fix the packs back onto the torso using some blue tack and then use some rolled out sculpey to build the layers of the apron and then "undercut" the edges to give the appearance of a floating piece of fabric while still maintaining some support for it. I did try to sculpt the fittings but it proved to be a little too difficult (and frustrating) so I will leave these parts until the sculpting is complete and either build them from some plastic card, putty, etc. or attempt with sculpey again when I am less frustrated with trying to achieve the shape.
Making the stand
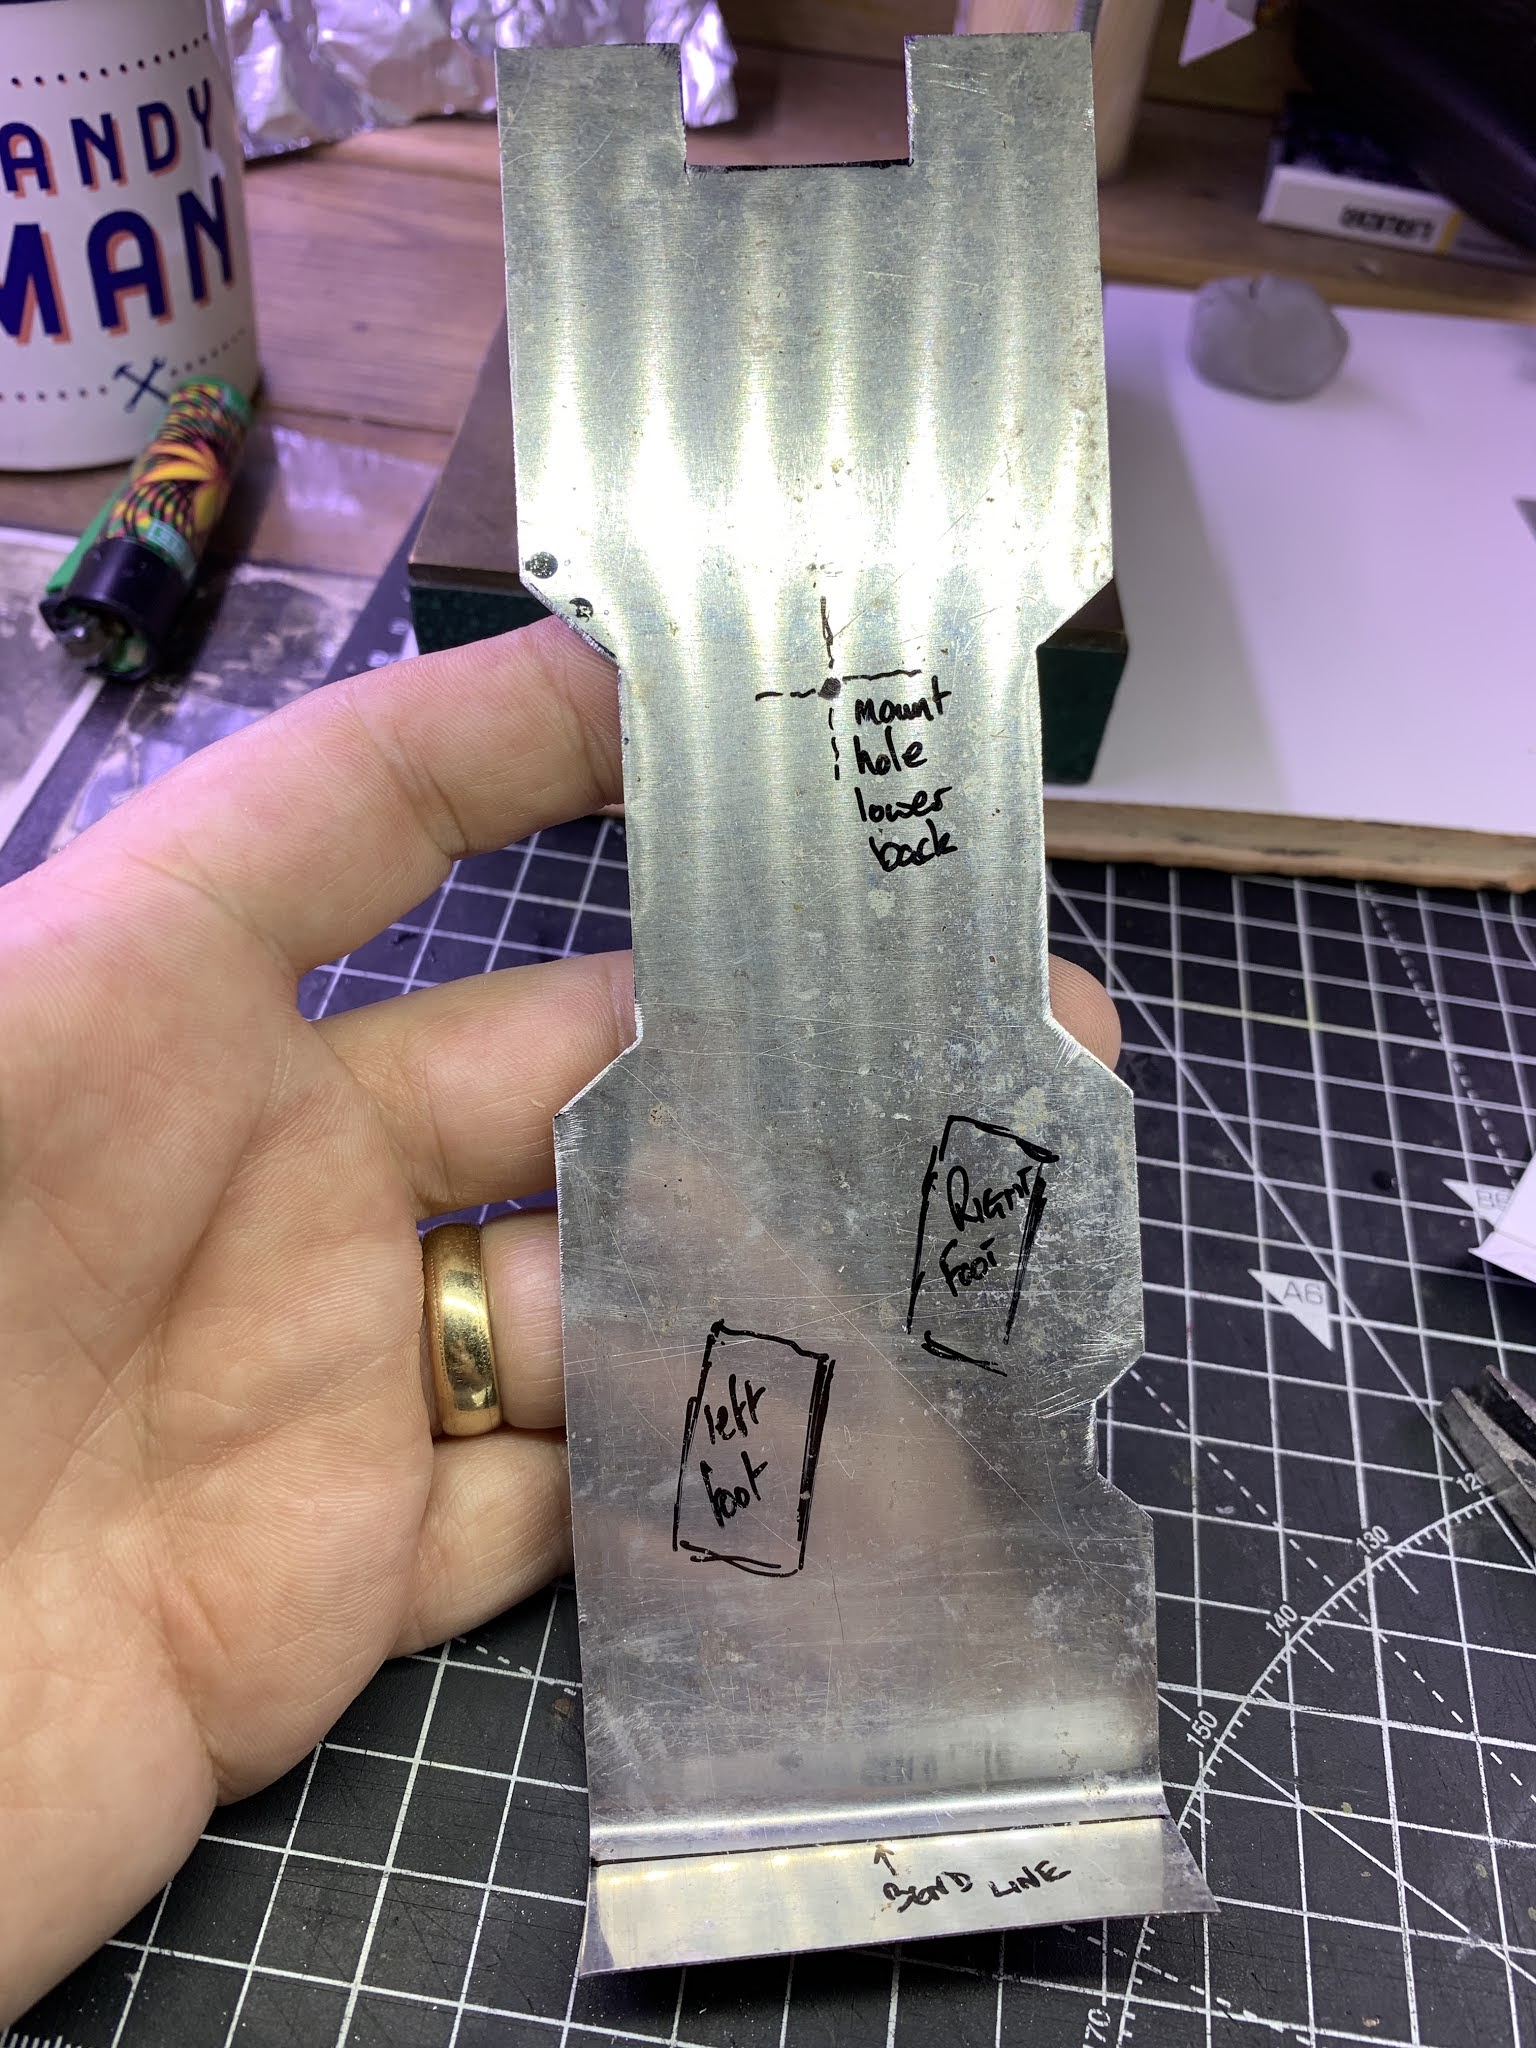
So far I am happy with the progress of the figure and while I wait for the pipe sample to arrive so that I can continue with the upper portion of the torso I decided to make a good start on the mounting plate. The illustration shows a futuristic and stylised section of what I can only assume is a structure of some kind. While I could try to replicate the structure as faithfully as possible; there is only some of the detail visible. Rather than try to match the rest of the structure by guess work I decided upon a design of my own that's inspired by the illustration. To begin the backing plate I used some very thin gauge aluminium sheet that's thin enough to be cut by a good quality scissors but does retain a surprising amount of strength. I sketched out a rough design of the plate and then cut and filed the plate to the sketch. I then drilled a small reference hole in the back of the plate for the mounting point of the figure and finished up the initial sculpt of the back of the figure to match the plate. This can be seen in some of the photos above.
To begin the process of making this a little more interesting than a flat piece of aluminium I first super glued a thin sheet of styrene to the surface to make gluing further styrene pieces to it a lot easier. Once the glue had fully hardened I then began cutting various angled and squared styrene pieces of various thicknesses to the plate. I continued to do this until I achieved what I believe is a visually interesting backing plate for the figure. Here's a couple of photographs that show the plate prior to painting, mounting and weathering.
The first part of any painting process for me is priming followed by the base coat. I will try and keep close to the original image and finish in silver however the base coat is in matt black so that it can provide a good base for the silver paint.
Rather than painting a block colour of silver I decided to try out some metallic acrylic paints that I picked up from Aldi for a VERY reasonable price. The silver was dry brushed onto the stand in several coats until a very nice sheen of silver was achieved. I then mixed some blue metallic in with the silver and dry brushed that onto the outer two edges of the stand. The colours obtained were really nice and I must admit that its tempting to leave the stand as is; however I want to add a little more depth and interest to the stand. I will dry brush some gunmetal in various places and then pin wash in black to get something a little more interesting. I will then as a final coat to give that dystopic vision to piece use some winter streaking effect from mig. To mount the stand I eventually opted to 3D print a basic plinth and then add similar detail to it as the stand itself. I won't go through the discussion of the build for the base as its identical to the stand so I will just add the construction photos below for you:
The head sculpt
At this stage in the sculpt I had hoped that the pipe I wanted to use for the helmet mount would have arrived but unfortunately its still in the UK postal system somewhere. I feel confident enough to continue with the head and then build around it when the pipe eventually appears. I always spend a little time getting the shape and proportions right. As a general rule the eyes are normally an eye distance apart, the ears join the head parallel with the corner of the eye and the bottom of the nose; the mouth is about as wide as the pupils are apart. Following these general rules I then map out the facial features with a series of lines on the skull that act as a guide for me to build on the features.

For the features I decided to not try to copy the artist simply because I am not yet good enough to replicate an identical face. I hope to be one day but for this sculpt I opted to replicate the facial features and to try and capture the mood of the piece. I am really happy with how it tuned out and the face was a little easier than most as I didn't have to worry about the ears or hair as both are covered with a scalp fitting interior cap.
The helmet ring as previously mentioned will be based on a 32mm drain pipe that I bought from ebay that finally arrived in the post. The pipe was a little too large in diameter for my needs so I cut out a section and then super glued it back together. To obtain a good fit on the figure I removed some of the sculpey from the shoulders and then added some more sculpey to build up from the figure and form a good solid base for the ring to sit on. A little wrinkle work to simulate fabric and I am very happy with the results. I did however have to re-work the large pouch on the chest as this now felt too small for the sculpt.
For the inner portion of the helmet ring I added some plastic card to act as the inner liner and then added small individual rectangles of plastic card to simulate the padded sections shown in the illustration. Once happy with the overall effect I then started to add the helmet liner to the figures skull and shaped accordingly with the addition of some fabric wrinkles and stitch lines so that at a quick glance the figure is obviously wearing something and isn't just bald!

There will be the need for additional components such as the oxygen hoses and wires etc but I won't attempt to make these out of sculpey as once its heat cured it becomes quite brittle so thin wires and hose's will break as soon as its handled in any way. I'll make these out of wire, plastic card and epoxy putty when I'm in the painting and finishing stage. The only real "sculpting" left for the figure is now the hands which as I have previously said in this write up is one of my least favourite things to sculpt. I am going to try and keep an open mind however as the boots went quite well compared to my past efforts so I'm hoping that I have the same good luck with the hands; fingers crossed!!
So lets be honest here and say that the hands will not win any sculpting awards anytime soon! I am however not going to do any more sculpting work on them. They are not as per the original source image but then again I was never aiming for 100% accuracy; just a good resemblance. I left them a little "thicker" than normal because he is wearing gloves and I intend on doing some finishing work to them when I am ready to paint the figure and add the additional details.
While I was sculpting the hands I also figured out how I would mount the figure to its base. I used a dental burr to drill out a larger hole in the back and then glued in a small nut. This will allow me to bolt the figure the base quite effectively and if it was ever damaged I would be able to repair it easily by removing it from the stand. I also decided to re-sculpt the side pouches on the chest because I really wasn't happy with the first pair that I made. I also finished off the T-shirt details. Even though you won't really see any of the t-shirt details once the neck mount is attached, I still wanted to make sure that everything was done properly :
If you are wondering what the writing is on the back of the figure; it just transferred notes from the metal back that's written in permanent marker. To finish off the leg mounts? or leg attachments? Whatever you want to call them; I first baked off two circular rings on the handle of one of my sculpting tools and then glued them onto the figure. I then wrapped a ring of sculpey around the baked ring and sculpted in the details before baking off a second time. I'm glad I tried to re-sculpt these rather than make them out of plastic card as I originally intended purely because I have now increased my sculpting skills once again.
The Helmet
Although I suppose I could have gotten away with not including the helmet I decided to include it in this sculpt for two main reasons:
1. I think that it will really add something to the overall finished piece
and
2. A helmet is featured in almost every piece of artwork that Derek Stenning has produced for this series and I feel its important to include what I think is an iconic shape that will define this and future sculpts that I have planned on his body of work.
To make the helmet I went through a number of different processes to achieve what turned out to be a really difficult shape to replicate. I'm not sure why it proved to be so difficult but I suspect its a combination of the overly large size compared to the figure, the actual shape and also my inexperience. My first thought was to bake off some clay on top of a "ping pong" Easter egg that I have in my draw (don't ask why I have an Easter egg ping pong as this will be used in a future project I have planned). Unfortunately the helmet shape was too large and too uniform so I had to go back to the drawing board once again. Eventually I decided to shape the helmet over a 10 mm glass lab beaker from a set of lab beakers that I bought last year for use in cleaning my airbrush. Once the rough shape was achieved I then baked and refined the shape before baking again. I also baked the helmet in two pieces to ensure that I could remove the baked sculpey from the glass with ease and then glued together with bake and bond. I then added the exterior details and baked one more time. For the interior I then ground out the excess baked clay and added more clay to finish the interior cushions of the helmet and baked for a final time.
During the second part of the sculpt of the helmet, it began to crack along the seam. The Bake and bond cam into its own once again. A quick bond followed by a small amount of blended clay allowed me to carry on as if nothing had happened. I really can't recommend this product enough.
The crack now sealed, I returned to the finishing outer details of the helmet followed by the construction of the interior:
BALLS!
There are two orbs or balls used in the image and in fact they are used throughout the artists work so I have to included them in this sculpt. There are a number of ways to create a ball with clay but I must admit that I had already decided to take the easier option and I had ordered some wood balls from Ebay a week previous to needing them. To complete the balls I first sanded off the varnish and then coated the bare wood liberally with some baby oil to aid in adhesion of the clay. I then wrapped some rolled clay sheet over the ball and baked after adding some scribed detail and circular panels. It was then a simple case of fastening some copper wire in the ball using some 5 minute epoxy adhesive.
Last Assembly of parts
All of the parts are now complete. It is just a case of arranging the wires around the figure and drilling some mounting holes to accommodate them. I will add some more detail wires and additional details to the helmet etc when I start to prime and paint the figure. This will be on a separate page as this is an extremely long page as its is. Here's some final shots of the temporarily assembled sculpt in its finished condition prior to paint:
Final Thoughts
I will write this last chapter in a more unusual way than I normally do. I have (I think) figured out why I am personally drawn to this collection of artwork. The title "born in concrete" with subheadings of dystopic, etc give meaning to I suppose my current outlook on the future. I work and research cutting edge aerospace technology as part of my job role and all of the imagery that the artist uses is of course aerospace in origin. One of the other major influences in the work is the embedding of the technology in a ruinous futuristic environment where the subjects are haggard and drawn in their appearance as if somehow less human due to the technology and a distinct lack of anything natural in their surroundings. This is my current vision of our future. We are advancing in technology at an incredible rate to the detriment of our own personal health and well being and that of our environment. The introduction of electrical power-plants over fossil fuel hides the stripping of elements from the ground and the poisoning of the environment further. I suppose that the artwork reflects everything that I currently believe mankind is destined for.
On a more upbeat note; I hope you enjoyed reading about the production of this sculpt and of course the finished figure which will have its own link here (eventually). As always I would love to hear your thoughts in the comments below and I'll end by saying that I will definitely sculpt a few more inspired figures in the future from this amazing body of work by Derek Stenning.
An Admission!
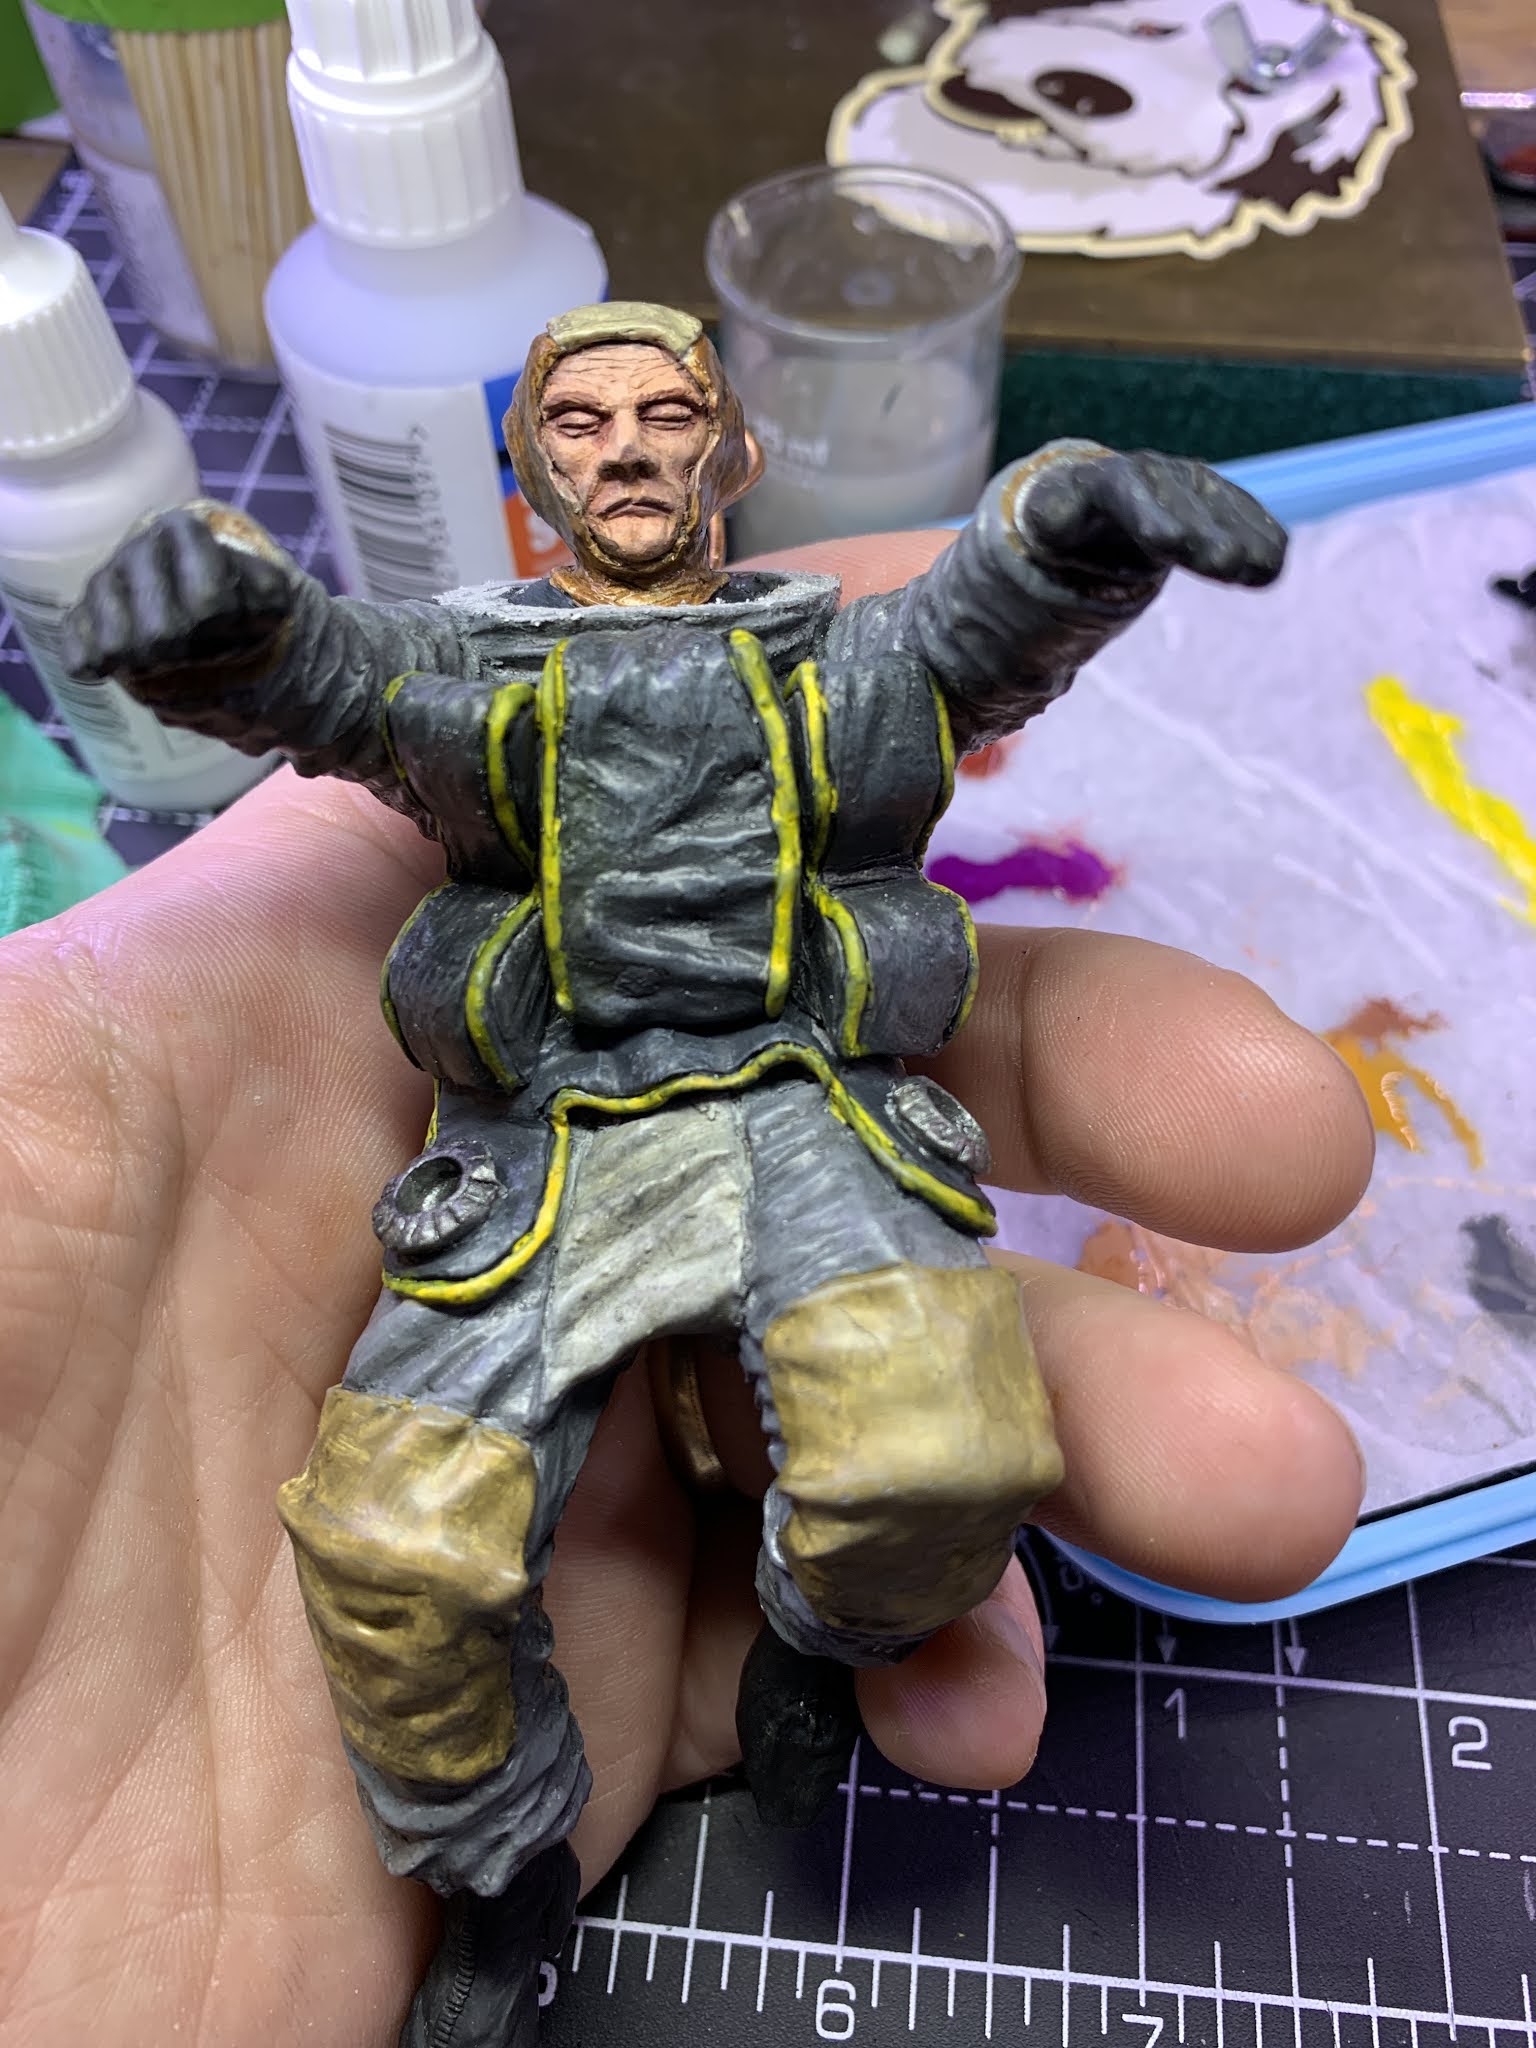
OK I know that I said I would create a separate page that covered the painting of the figure but; I completely forgot to take regular photo's as I painted it! I can only apologise for this however here's a couple of photo's of the figure now painted and I will make a point of taking additional photos when I can as I have since added some additional coloured aluminium wires to add to the "floating" effect :


Wow, great work.
ReplyDelete